 2/3/06
I ordered kit 9 this morning.
2/3/06
I ordered kit 9 this morning.
2/3/06
I ordered kit 9 this morning.
6/3/06 I've just checked with Modelworks and their courier was on holiday at the end of last week, so kit 9 is being dispatched today. I made another improvement to the tender, described under kit 4. I've been contacted by Mark, who is currently building kit 3 - he is the 9th builder to contact me. He has given me some useful advice on painting, as have Tim and several of my other contacts. I'll perhaps start a separate page on painting soon. I've just had my first practice session with the airbrush on a spare piece of laminate - I can see that several more will be needed to get the technique right. My wife seems capable of sniffing out individual molecules of cellulose thinners and reacts by opening every window in the house, so I'm sitting here shivering at the moment.
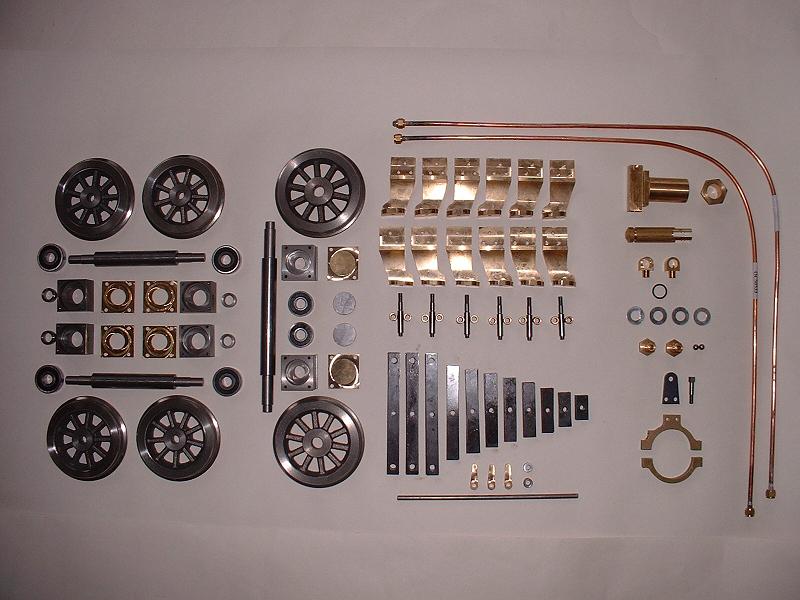
7/3/06 Kit 9 arrived this morning. It consists of the bogie and pony wheels, axles, axleboxes and bearings, the main springs, brackets and hangers, the axle pump and its pipework, and part of the cylinder cock operating linkage. I checked and photographed the parts, which all seem present and correct, except that the instructions mention a pump spacer fitted between the pump body and its stretcher which isn't listed in the inventory or included in the kit. I have checked with Debbie and the spacer is needed and is included in kit 10, but she's kindly offered to send me one out today. I have ordered some two-part etch primer and quick-drying thinners from Phoenix so that I can start on the airbrushing, along with their livery data sheet for the Britannia. I've been contacted by Harry W, who is currently building his tender.
 8/3/06
The pump spacer arrived in the post this morning. I started to assemble the bogie wheels and axles. I'd been forewarned by Richard R and Ted that I might find that the spacers between the axleboxes and wheels were too thick, and this indeed was the case - the wheel hubs projected about 0.6mm beyond the ends of the axles, and they should be flush. They were too tight a fit in 5" track. I contacted Debbie, who offered to take them back and machine them for me, but I filed them down from 7mm to 6.4mm - it hardly took longer than walking to the postbox and back. To keep the faces parallel, I rubbed the spacer along the file, turning it after every few strokes. I glued the bearings and pressure pads to the axleboxes and adjusted the position of the horn blocks to get a good sliding fit. I cleaned up the wheel castings with a small file. I can't glue the wheels to the axles until I have painted them and the axleboxes.
8/3/06
The pump spacer arrived in the post this morning. I started to assemble the bogie wheels and axles. I'd been forewarned by Richard R and Ted that I might find that the spacers between the axleboxes and wheels were too thick, and this indeed was the case - the wheel hubs projected about 0.6mm beyond the ends of the axles, and they should be flush. They were too tight a fit in 5" track. I contacted Debbie, who offered to take them back and machine them for me, but I filed them down from 7mm to 6.4mm - it hardly took longer than walking to the postbox and back. To keep the faces parallel, I rubbed the spacer along the file, turning it after every few strokes. I glued the bearings and pressure pads to the axleboxes and adjusted the position of the horn blocks to get a good sliding fit. I cleaned up the wheel castings with a small file. I can't glue the wheels to the axles until I have painted them and the axleboxes.
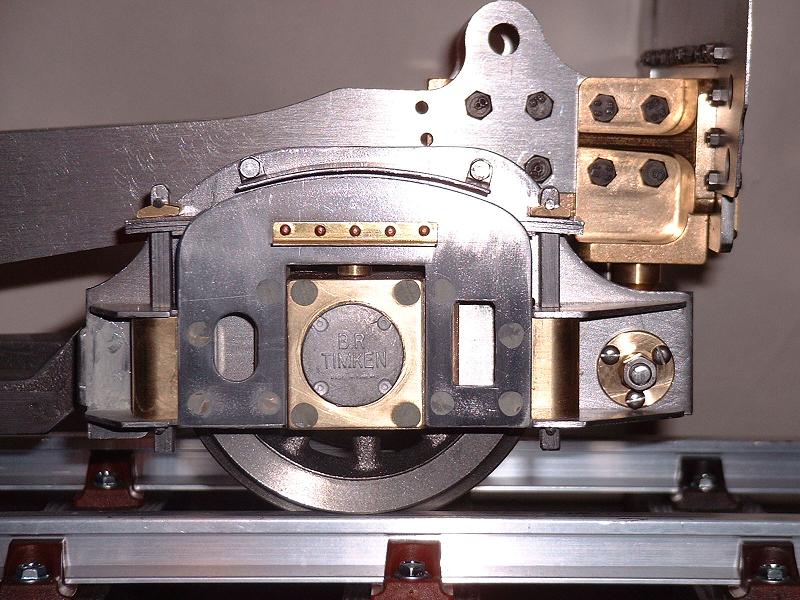
9/3/06 I cleaned up the pony wheels and glued them to the axle, and glued the bearings into the axleboxes. I adjusted the horns to make the axleboxes a good sliding fit, rounded the edges of the axlebox covers and filled the countersunk screw heads. The Timken bearing covers really need to be raised off the axlebox covers to match those on the tender, so I cut 3mm collars from a length of 23mm tube and glued them on.
 10/3/06
I replaced the 8 bolts on each pony outer horn plate with countersunk screws, since the real locomotive doesn't have bolts here. I fitted the bottom taper pins to my modified spring struts - see kit 6. I started to assemble the axle pump - the pump body, inlet and outlet valves and the pump ram went together easily enough, but the strap that fits around the eccentric on the driving axle is too tight and will need some attention.
10/3/06
I replaced the 8 bolts on each pony outer horn plate with countersunk screws, since the real locomotive doesn't have bolts here. I fitted the bottom taper pins to my modified spring struts - see kit 6. I started to assemble the axle pump - the pump body, inlet and outlet valves and the pump ram went together easily enough, but the strap that fits around the eccentric on the driving axle is too tight and will need some attention.
11/3/06 I inserted a shim between the two halves of the eccentric strap, which gave a nice smooth fit with little friction. I then tried to fit the packing around the pump ram - this needs to be pushed down into the gap between the ram and the screw thread for the gland nut. This proved difficult with the pump installed, since I couldn't get at the upper side, so I removed the complete pump stretcher with pump attached and then pushed in the packing (which is string impregnated with graphite or something similar) using the end of a nylon cable tie. I then reassembled everything and tried turning the pump, but it didn't feel quite right. On dismantling and measuring up, I discovered that the O-ring on the ram was running into the packing at the outer end of its stroke. It seems to me that the pump spacer mentioned above is too thick - it only needs to be about 2-3mm thick to prevent the ram hitting the bottom of the pump bore, but at 8mm thick it puts the ram too far out the other way. The distance from the outer end of the pump body to the outer end of the ram should stay within the range 24mm to 42mm, but with the 8mm spacer it actually travels between 32 and 46mm. I'll ask Modelworks about this on Monday. The etch primer and thinners from Phoenix arrived this morning, so I'll be able to resume practising with the airbrush. The livery data sheet also arrived - no real surprises in this, but lots of little details such as the fact that the edges of the buffer beams should be black rather than red (although nobody seems to have told the person who painted the real Oliver Cromwell!)
12/3/06 I went along to the St Albans club track near Kings Langley - the first time I'd been there. My aim is to learn to drive steam locos by the time I have my own completed. There were no trains running today, but there were about 10 of us there and we cleared a lot of leaves from the track. Hopefully there'll be some steaming next month. I filled the countersunk screw heads on the pony in preparation for painting, and started fitting the main spring brackets to the mainframes. Following advice from Ted, I eased the pump eccentric strap so that it fits nicely without the need for a shim.
 13/3/06
I filed all the main spring leaves to remove the rough edges, and fitted the springs to the spring pins and then screwed the pins into the underside of the axleboxes - I found that it's easier to do this before the spring brackets are fitted. No word from Debbie yet on the axle pump question, but Ted has fixed his today by making a longer pump connecting arm.
13/3/06
I filed all the main spring leaves to remove the rough edges, and fitted the springs to the spring pins and then screwed the pins into the underside of the axleboxes - I found that it's easier to do this before the spring brackets are fitted. No word from Debbie yet on the axle pump question, but Ted has fixed his today by making a longer pump connecting arm.
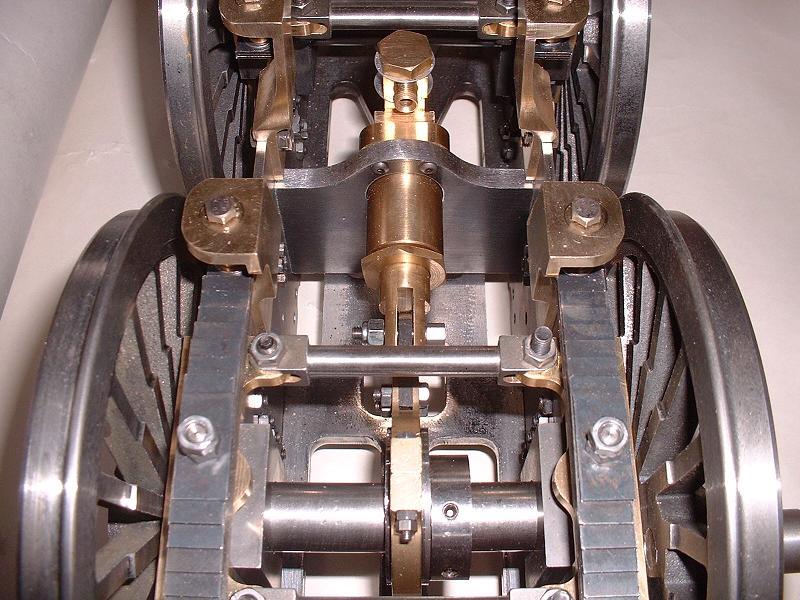
14/3/06 I finished fitting the spring brackets - this photograph shows the springs and the axle pump, still with the full thickness spacer behind the pump stretcher. I also fitted the cylinder cock linkage which comprises a rod through the main frames just above the rear axle of the bogie, with lever arms at each end and in the middle. I set the locomotive upright on all its wheels and checked the ride height. Most of the weight of the frames was carried on the bogie and the rear driving wheels - the front and central driving wheels and pony were hardly loaded at all. However, when I placed a 35lb weight on the frames, the driving wheels took much more of the load - the bogie springs compress more easily than the main springs. The pony was still slack, but I think that with a full boiler which must weigh 75lb or more the main springs will deflect several mm further and it will probably be OK. This more or less completes kit 9, apart from sorting out the axle pump spacer - I don't intend to fit the pipes to the axle pump at this stage. I shall paint the bogie and pony before ordering kit 10 next week.
15/3/06 Debbie left me a message today confirming that there is a problem with the axle pump but asking me not to reduce the thickness of the spacer, so perhaps they are planning to issue a longer link arm. Update 21/6/06: a longer link arm was delivered in kit 15.
16/3/06 I partially dismantled the bogie and pony in order to paint them, removing the wheels and axles, axleboxes, horn stays and springs from the frames. I degreased everything four times with cellulose thinners, and then brushed on a coat of single-pack etch primer. I didn't want to use my airbrush for etch primer until I've had more practice, but I will try spraying the black enamel.
18/3/06 I've just finished my first airbrushing session, which I think was reasonably successful for a first attempt - at least there are no runs or blotches. I've done the sides and undersides of the bogie and pony frames, and a few other bits and pieces. Masking off all the horn block faces and other bearing faces took some time. I mixed the black enamel and the quick-drying thinners about 50:50 and gave each piece 5-6 very thin coats in a 2-hour session. The result looks pretty good, although it will need at least the same again to get a really solid coverage. Mark has told me that he uses an 80:20 enamel to thinners ratio, so I may try that next time.
19/3/06 Ted came round to see me this morning and showed me some photos of his model - he is up to date at kit 14, the smokebox, and has painted his locomotive. He gave me some tips on assembling the valve gear and motion. He is waiting for a fix from Modelworks for a problem with the valve gear before he can test on air - the problem is that the return crank on the main crankpin gives too much movement to the expansion link and valve piston, and the fix will probably be a new return crank with a smaller throw. I had another airbrushing session using less thinners, with mixed results - the coverage was better, but the finish was matt and grainy in places which I think means that the paint is drying before hitting the surface - caused by not enough thinners, or too much air pressure, or holding the airbrush too far away from the surface. I'll keep trying!
 20/3/06
I ordered kit 10 this morning. I masked up the bogie and pony wheels, axles and axleboxes, and airbrushed them. The entire front face of each wheel is painted black, as in the real locomotive. I used slightly more thinners and the result looks better, although still not a uniformly high gloss - perhaps more coats will help.
20/3/06
I ordered kit 10 this morning. I masked up the bogie and pony wheels, axles and axleboxes, and airbrushed them. The entire front face of each wheel is painted black, as in the real locomotive. I used slightly more thinners and the result looks better, although still not a uniformly high gloss - perhaps more coats will help.
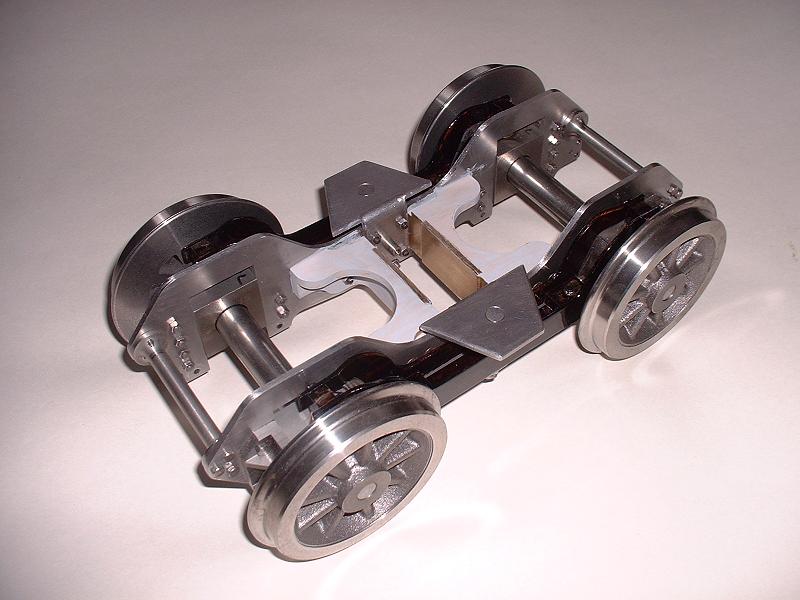
9/7/06 I've finally finished painting the bogie, as shown in this photograph. I found that the best way to get a clean edge to the paint on the front face of each wheel was to mask just the wheel tread and not the bevel, and carefully remove the paint from the bevel with fine wet-and-dry paper on a hard backing pad.
27/4/07 Following the successful boiler test by David from the St Albans club yesterday, I removed the axle pump and took it round to his house this afternoon to get it tested - far better to find any problems at this stage rather than during the first steaming. It was very difficult to remove because of the way it's bolted through a hole in the stretcher - I had to make up a straight 2mm allen key with a long handle to get at the screws, and then remove the end cap from the pump to get it through the hole. I'd like to be able to remove it from underneath without dismantling it, and I'll think about how best to adapt the mounting to achieve this. The test showed that the inlet valve and the O-ring on the ram both seal well, but there is a slight leak back from the outlet valve at 180 psi. On inspecting the valve seat with a magnifying glass, we could see that it had not been cut cleanly and David suggested that I send it back to Modelworks to be corrected. Normally the ball can be lightly tapped onto the seat to improve the seal, but David thought that the seat was too uneven for this to work. We also successfully tested the two clack valves supplied in kit 16 for the boiler backhead feeds.
2/5/07 On reflection I've realised that the outlet valve on the axle pump doesn't have to withstand full boiler pressure, since the clack valve on the boiler backhead does this. It merely needs to seal well enough to allow the pump to suck water in, and it certainly does this, so I probably won't bother to return the pump to Modelworks.
 6/5/07
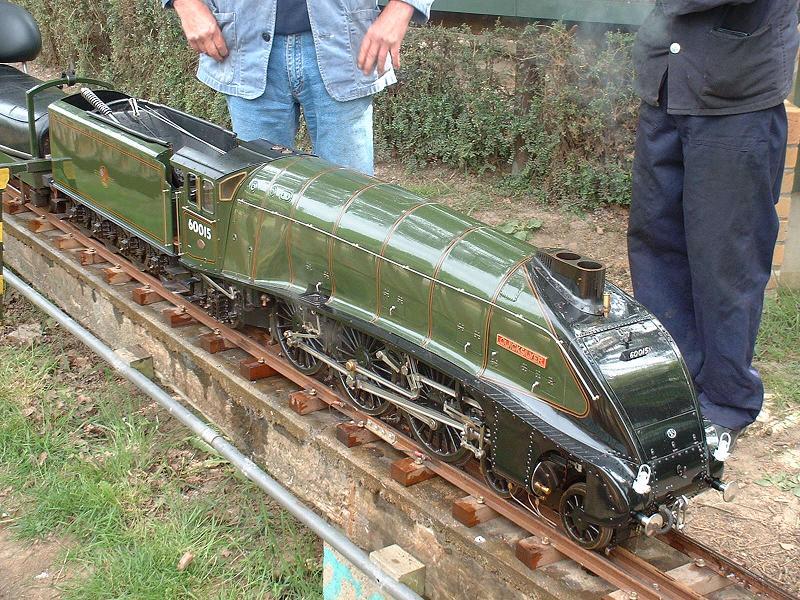
Yesterday I went to the LNER day at my North London club and saw among many fine models this superb 5" A4, along with a Winson 9F that was steaming nicely, both from the Colchester club. I've reduced the size of the gland packing nut on the axle pump so that it fits through the hole in the stretcher, but this still didn't enable me to refit the assembled pump - the leading axle gets in the way. I solved this by propping up the loco on wooden blocks and removing the stretcher downwards, then fitting the axle pump into it and refitting the stretcher to the frames. This was extremely fiddly, and involved removing the weighshaft brackets, so is not to be recommended. When I eventually dismantle the loco for painting, I'll probably cut away the bottom of the hole in the stretcher and make a larger pump spacer plate that I can bolt to the front of the stretcher to allow the pump to be removed downwards. I've also been thinking about ways of sorting out the inaccuracies in the motion gear, and I'll probably tackle this next.
6/5/07
Yesterday I went to the LNER day at my North London club and saw among many fine models this superb 5" A4, along with a Winson 9F that was steaming nicely, both from the Colchester club. I've reduced the size of the gland packing nut on the axle pump so that it fits through the hole in the stretcher, but this still didn't enable me to refit the assembled pump - the leading axle gets in the way. I solved this by propping up the loco on wooden blocks and removing the stretcher downwards, then fitting the axle pump into it and refitting the stretcher to the frames. This was extremely fiddly, and involved removing the weighshaft brackets, so is not to be recommended. When I eventually dismantle the loco for painting, I'll probably cut away the bottom of the hole in the stretcher and make a larger pump spacer plate that I can bolt to the front of the stretcher to allow the pump to be removed downwards. I've also been thinking about ways of sorting out the inaccuracies in the motion gear, and I'll probably tackle this next.
| Next Kit | Previous Kit | Index |