15/7/08
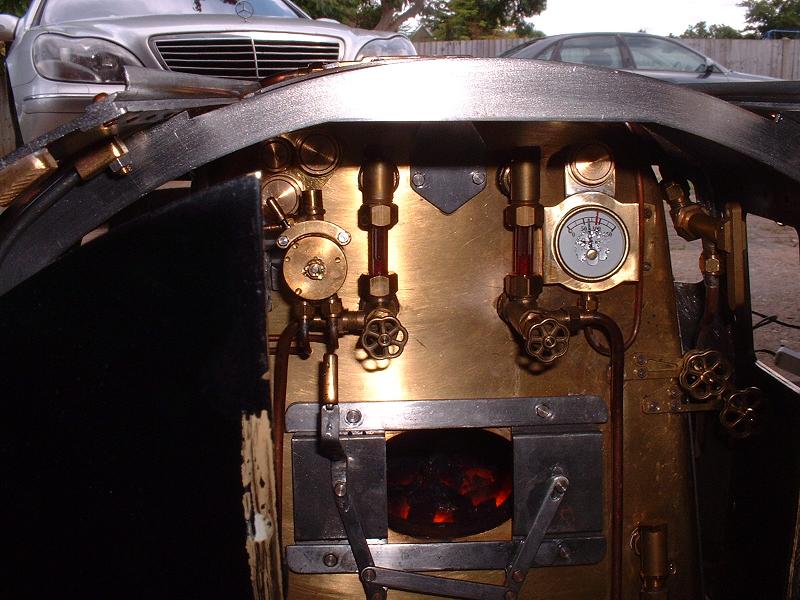
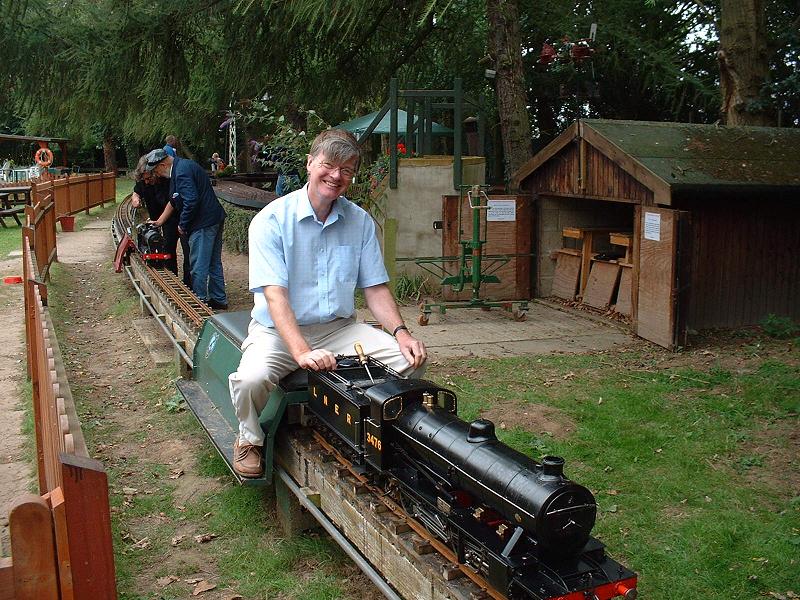
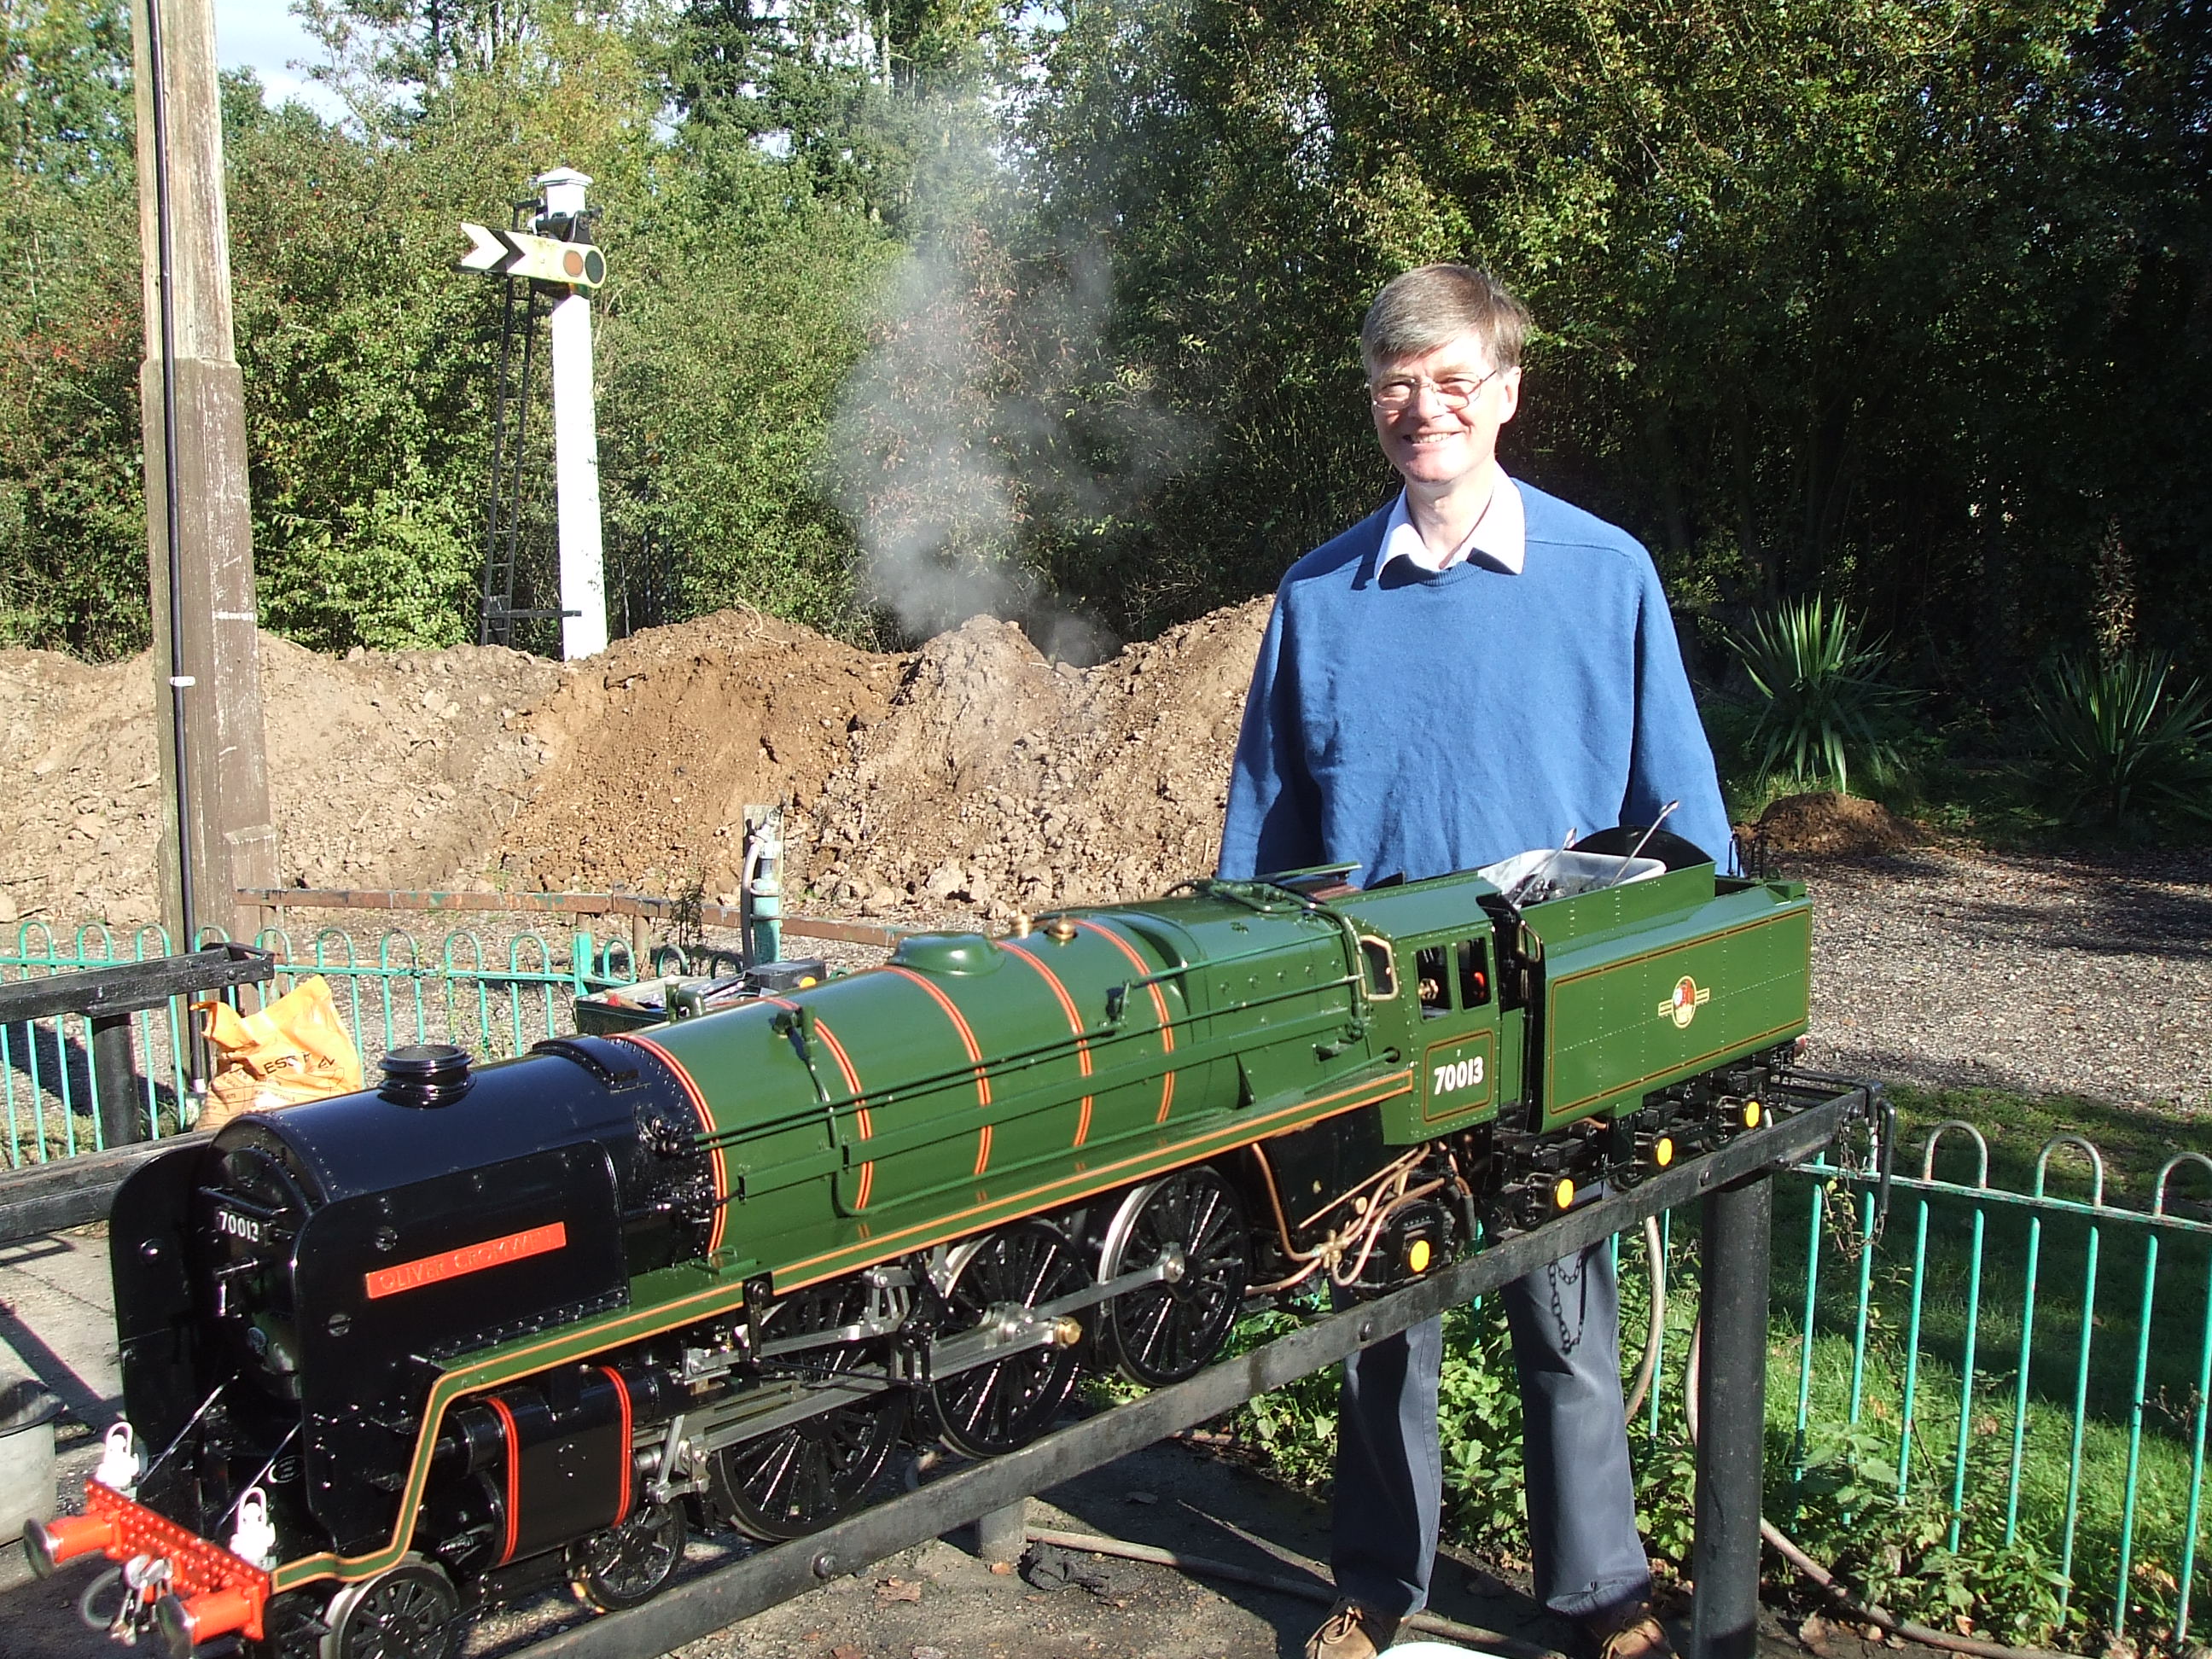
After sitting on an old sideboard in my study for over two and a half years of building, the loco has finally been moved onto its rolling road in the garage in readiness for its first steam trial tomorrow. Even with the help of the hydraulic lifting trolley it was quite a struggle for my wife and I to move it - it is too heavy to lift, and I had to build ramps to get the trolley down the 6" step from the house to the garage, and then to roll the loco from the trolley onto the rolling road. I fear that it may be a long time before I get my car back into the garage! The photo shows the dome cover filed and polished but not yet bolted to the cladding. I filled the tender with water and used the handpump to fill the boiler. This was a slow process, but I wanted to check that the handpump worked against boiler pressure so I filled the boiler to the brim and raised the pressure until the safety valves started to lift. I then drained it back down to working level through the water gauge blowdown valves. I may rig up an adaptor to connect the garden hose to the loco's handpump connector for future fillings. I checked the water feeds to the injectors and they gave a steady stream through the overflows. I oiled the motion with lubricating oil and filled the lubricators with steam oil, then connected the electric drill to the projecting spindles on the lubricators and ran it slowly to pump some oil through to the cylinders - the level in the lubricator reservoirs fell sufficiently to prove that they were both working. I also squirted a lot of lubricating oil down the blastpipe for good measure, and turned the motion over by hand a few times to get the oil to the valves and cylinders. Ted and Derek are coming round at 10am tomorrow, and as long as Ted remembers to bring the coal we should be all set to fire it up.
16/7/08
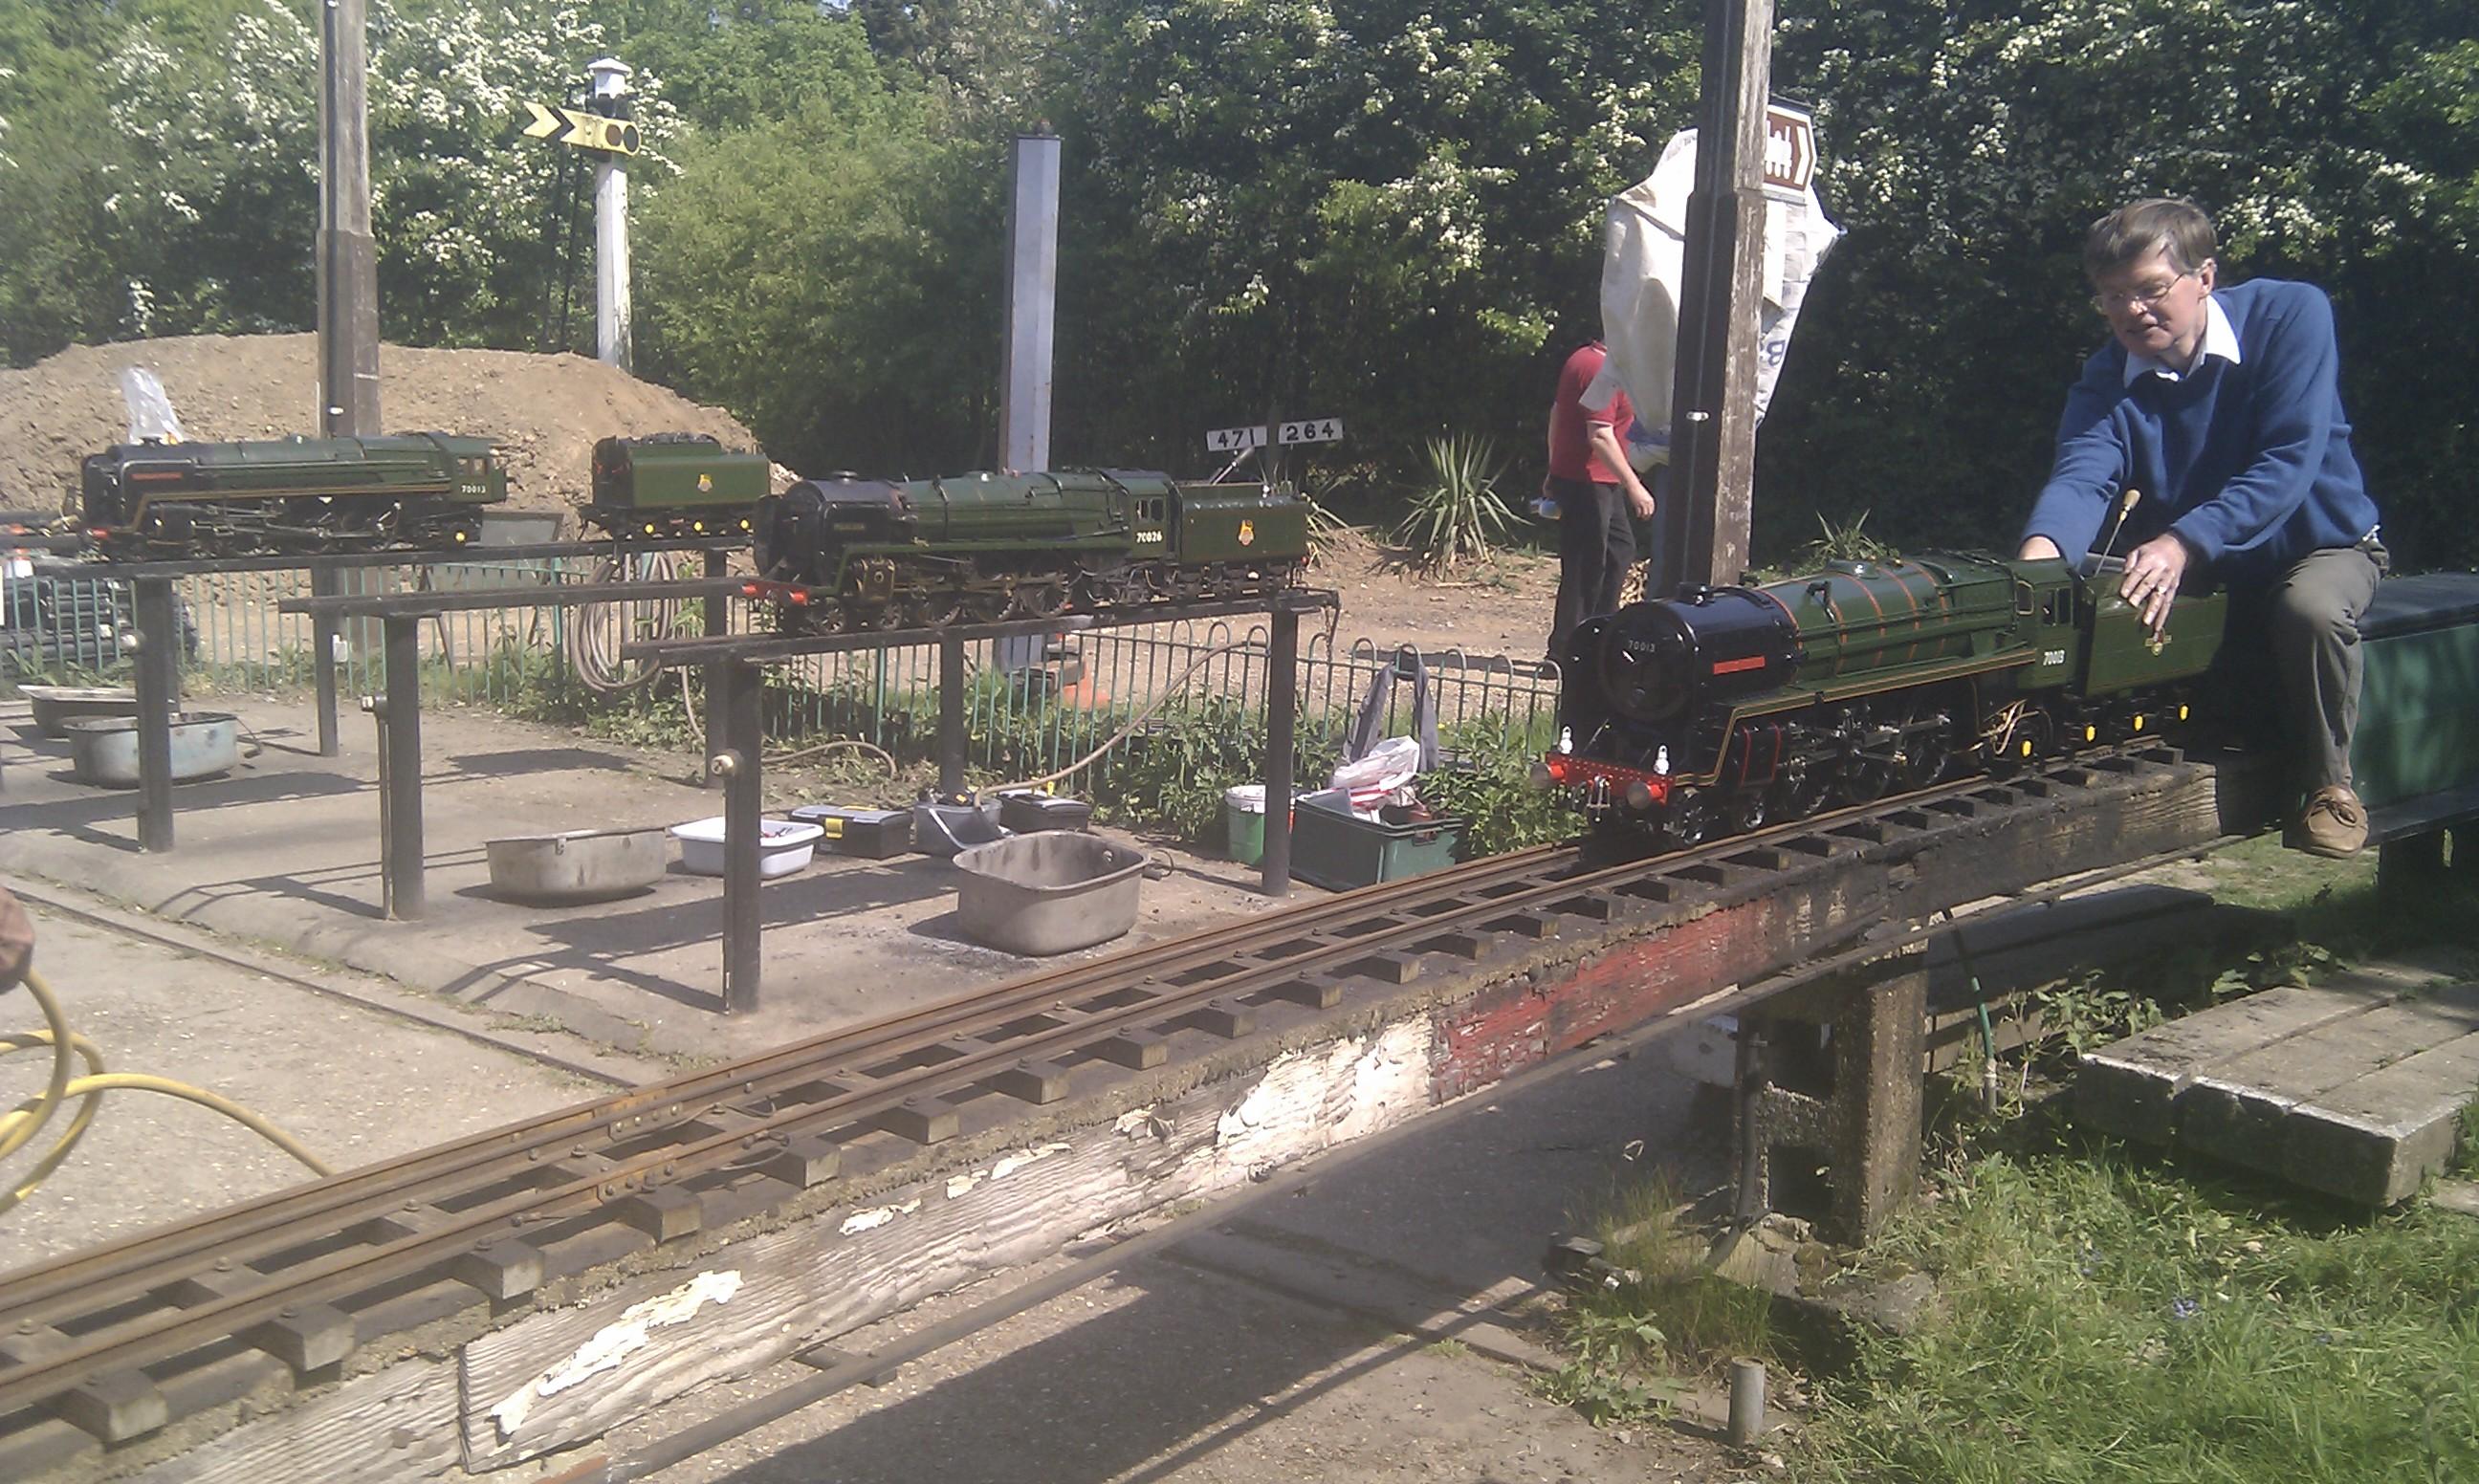
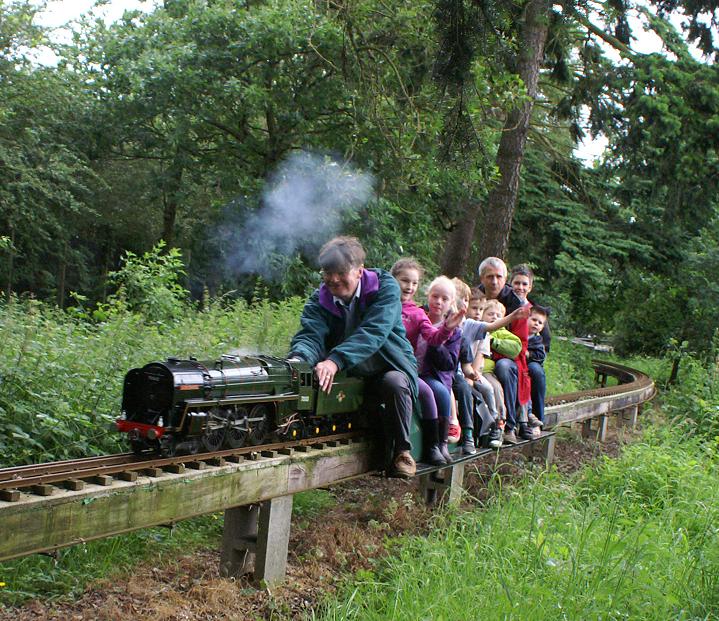
The first steaming this morning was a great success. Derek brought his own coal which was a mixture of anthracite and Welsh steam coal, all washed and sifted to remove grit. He laid the grate with sticks of wood soaked in flammable liquid - I forgot to ask what - set it alight and shovelled on what seemed to me a huge amount of coal as the fire got going - he remarked on how large the grate was. My Steamfittings blower powered by an 18v hedgetrimmer battery produced plenty of suction. After about 30 minutes we had some pressure in the boiler and switched over to the steam blower, which also drew the fire up nicely with only a very slight opening. The pressure rose quickly and the safety valves started to lift at about 60 psi, so they will need adjusting later, but we left them at this pressure for the first run. There were minor steam leaks from various fittings that will need attention, but nothing serious enough to spoil the test, so I engaged full forward gear and gingerly cracked open the regulator, and the engine sprang to life immediately and ran very smoothly on the rolling road. This short video clip shows the engine running, with a nice regular exhaust beat. It also ran in reverse, although not quite so steadily.
There was, as I feared, a fair amount of leakage past the piston valves - opening the regulator in mid-gear gave a blast up the chimney equivalent to having the blower full on - but it didn't seem particularly noticeable with the engine running. I get the impression that there's a lot of power in reserve, so it shouldn't prevent me from trying the engine on the track. The lubricators pumped oil, although there was some leakage under pressure on the check valve unions which will need to be rectified before I steam again. The axlepump worked nicely, and both injectors worked with just a slight dribble from the overflow at 50-60psi. The steam brake and whistle both worked.
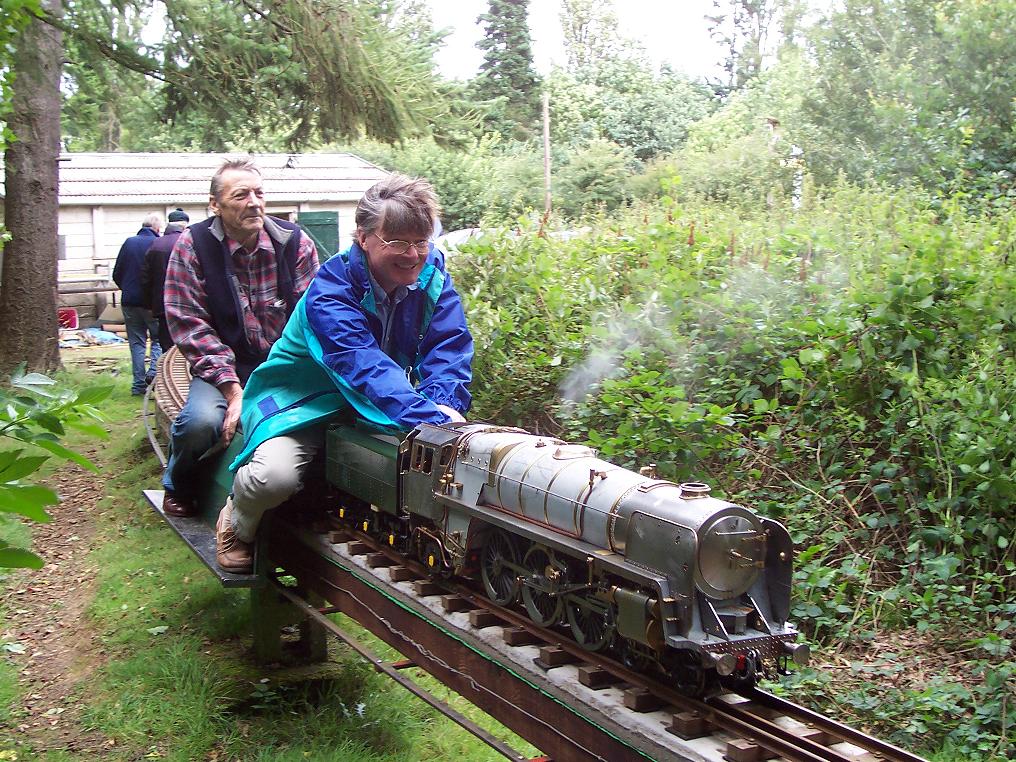
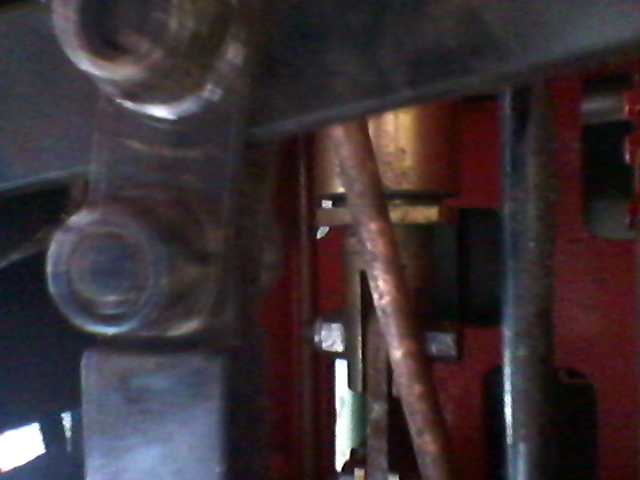
The regulator linkage was too stiff and I ended up operating the valve from the crank on the smokebox, so this will need rectifying too before running on the track. Derek felt that the blast from the blastpipe was actually too strong, causing the fire to burn very fiercely when the engine was running, and he had to leave the fire doors open to control the fire - an interesting problem to have, after hearing all the advice about sealing every nook and cranny in the smokebox in order to get sufficient draught. He has taken away the blastpipe nozzle to bore out and thread the existing hole and make a selection of inserts with different larger sized holes going up in 32nds or even 64ths to experiment with. The photo shows the backhead after the run with the fire dying down and 60psi still in the boiler - all in all, a very satisfactory first steaming.
18/7/08
My plan now is to run the engine on the rolling road a couple more times, to get more experience of firing and maintaining the water level and to shake out any more problems. I'll then take it down to the track for the official steam test and aim to get just a couple of sessions on the track on quiet afternoons this summer, before dismantling and painting in the autumn ready for a public launch next season.
I've started to fix the minor problems thrown up by the first steam test. The reverser gear was quite stiff when the motion was stationary, although easy to move when running (just like the full-size Standard Class 5 that I drove on the Watercress Line earlier this year). This caused the reverser handwheel to slip on its spindle, so I removed the gearbox and cut a dimple in the spindle to lock the grub screw. Derek has kindly bored out and threaded my blastpipe nozzle and made me three inserts with holes of 7.0mm (as the original), 7.3mm and 7.5mm. I'll try the larger ones to see how they reduce the draught, although I suspect that I may need the strong draught while I learn how to keep the fire going. I've collected some coal from the club, which apparently I need to wash and sieve before use to minimise ash in the tubes and smokebox. I had quite some trouble raking out the grate after the last run in order to raise the hinged sections back up to the horizontal position - there must have been ashes wedged between the fixed and moving grate bars. The important thing is that it drops reliably.
I'll make a longer crank for the regulator linkage on the outside of the smokebox, probably 12mm instead of 8mm, and also adjust the angle so that it closes at about 30 degrees forward of the vertical rather than 45 degrees - I don't think that the regulator valve will need anything like 90 degrees of opening to get full power. Hopefully this will give sufficient leverage to give me reliable control of the regulator, but I might also rig up a temporary crank sticking up a couple of inches from the spindle with a rod or cable back to the cab roof, as a foolproof way of closing the regulator for my initial track tests.
26/7/08
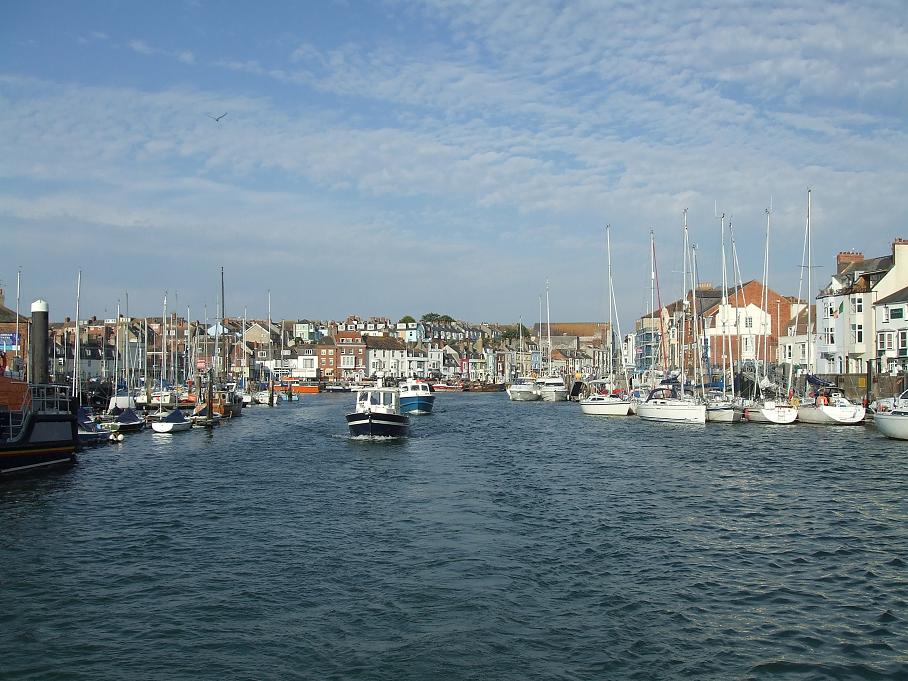
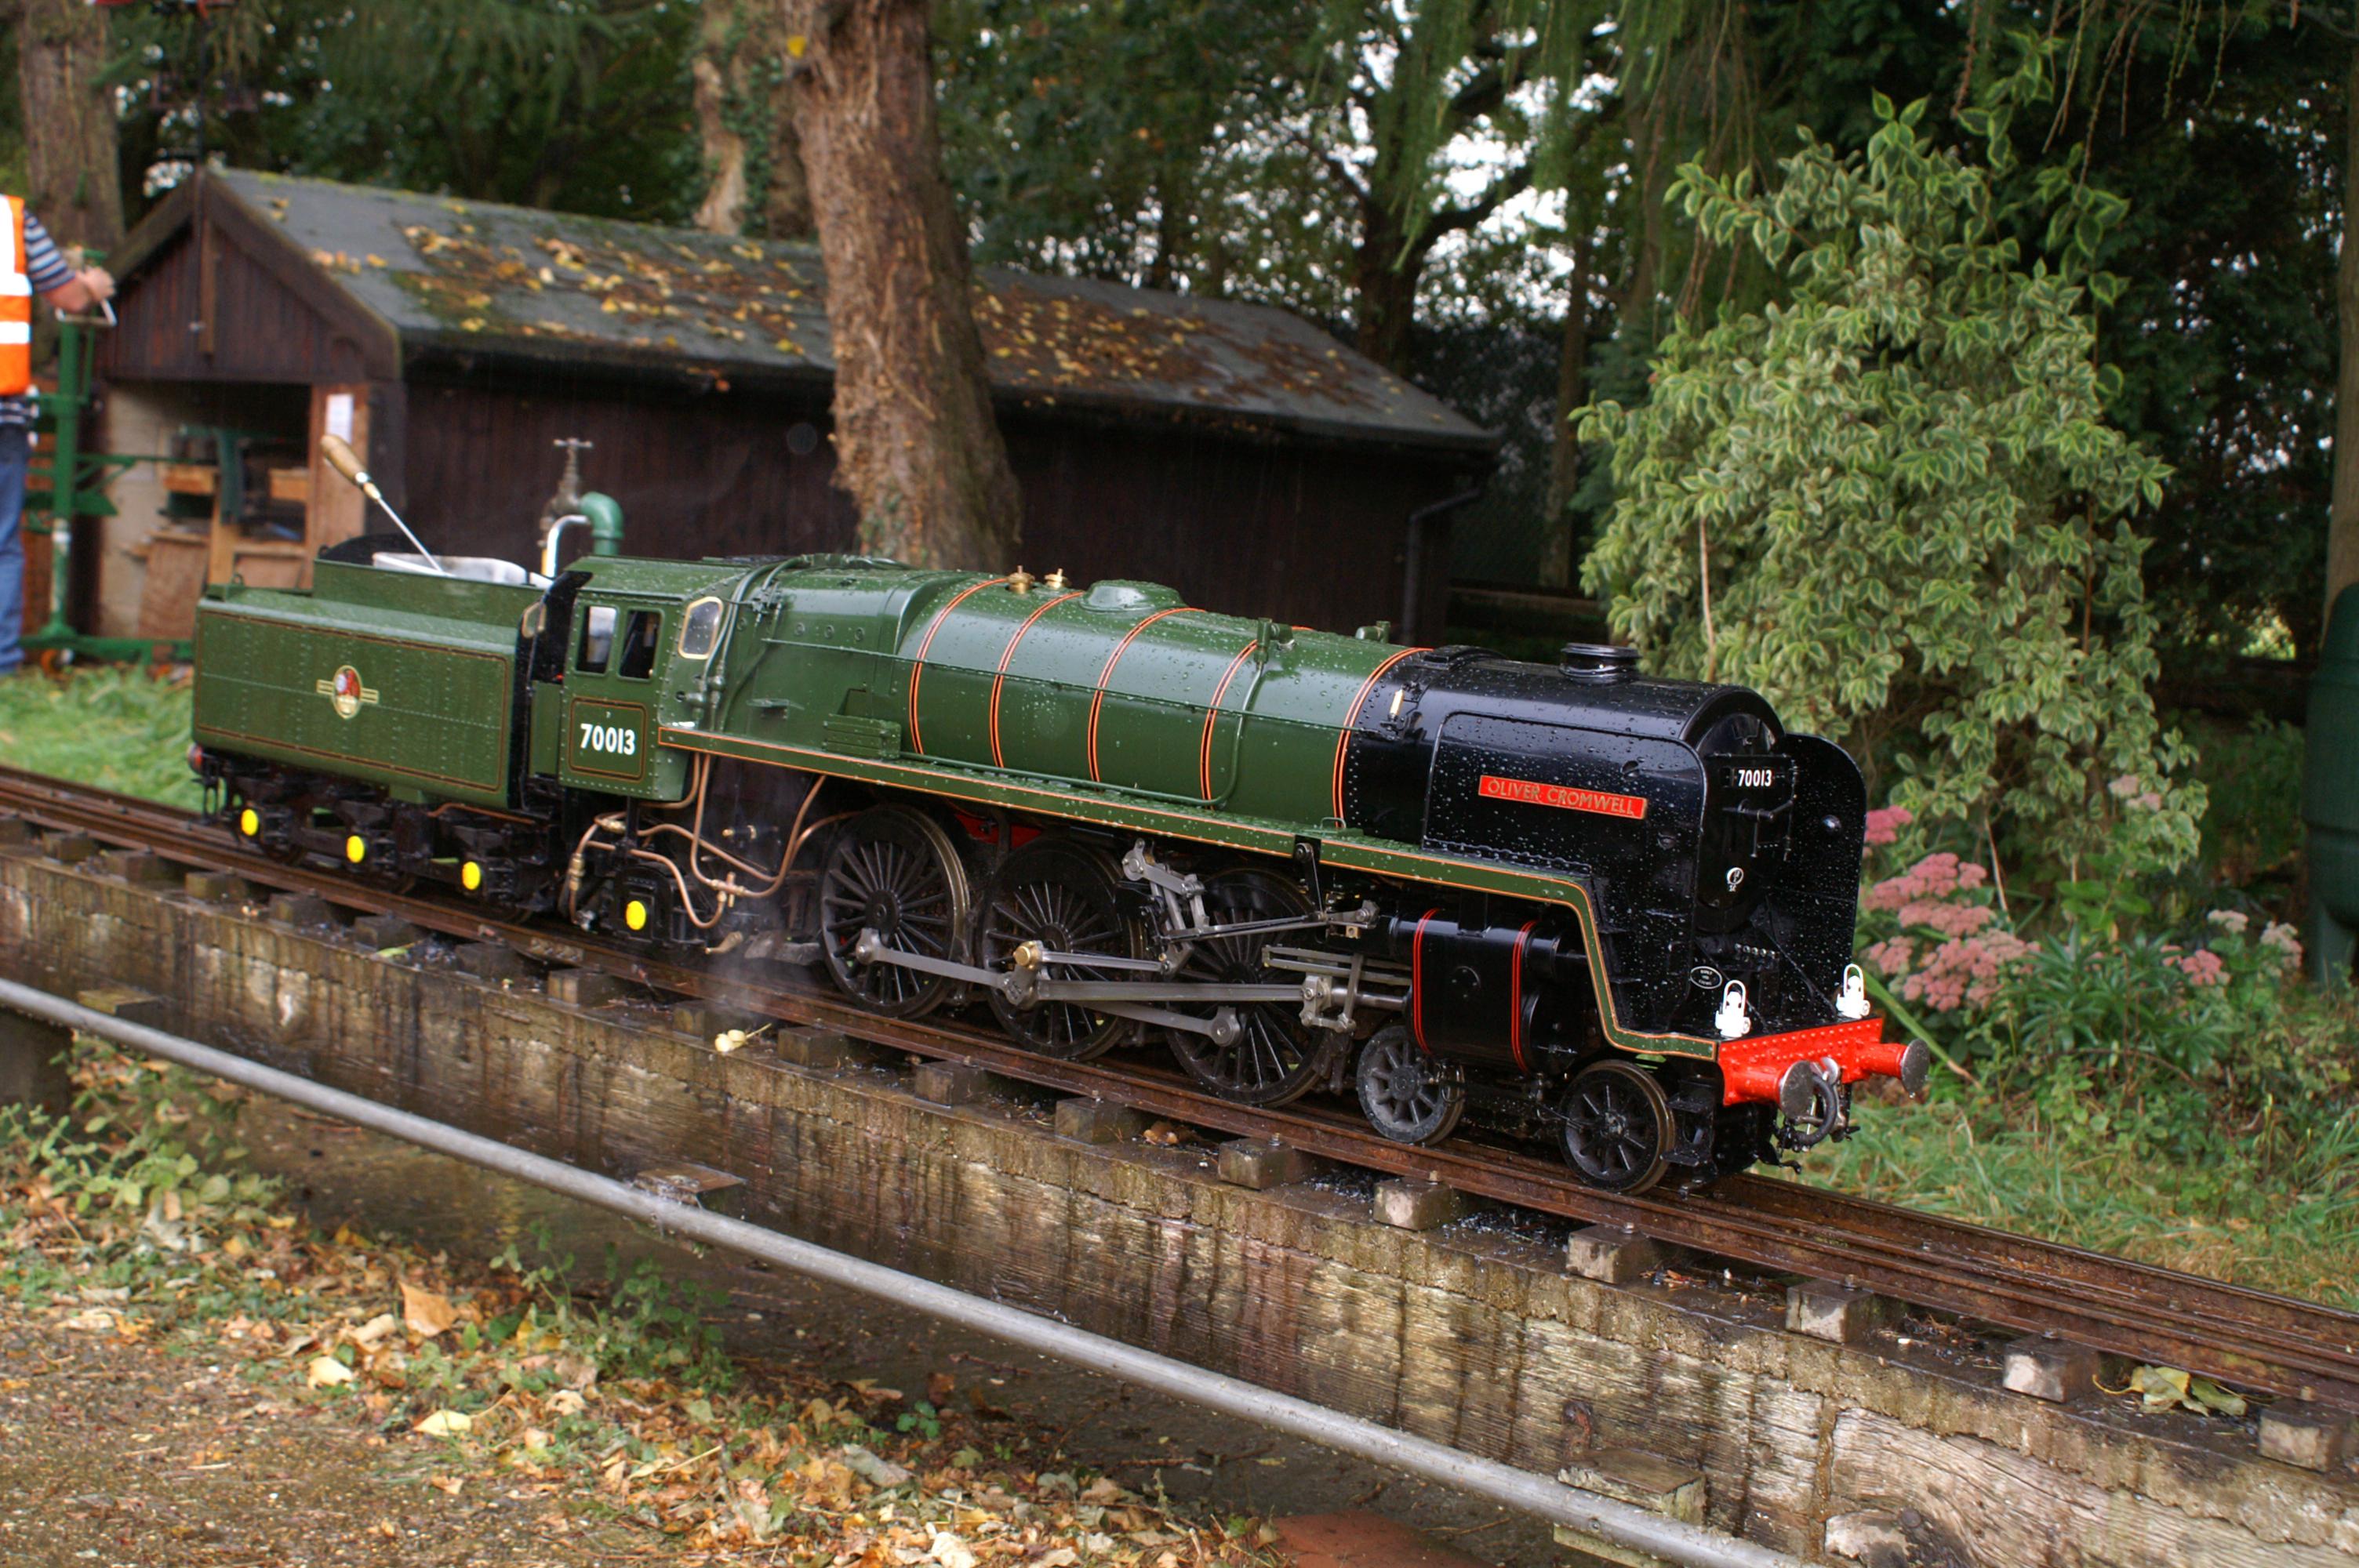
We're just back from a week's sailing - we sailed from Lymington to Weymouth (shown in the photo) via Poole and back, in perfect sailing weather. We were intercepted by an MOD patrol boat off St Alban's Head and sent 5 miles out to sea to avoid the gunnery ranges at Lulworth, my wife instinctively ducking as each gun roared out. We came back yesterday because I wanted to see 70013 hauling a passenger train through St Albans at 9.00 this morning en route from Victoria to Manchester, but unfortunately this excursion has been cancelled - apparently 70013 only finally left Loughborough for the mainline on Thursday of this week, now fully lined and varnished and with all the modern electronic safety gadgets. At least it will be ready for its 40th anniversary outing on 10 August. I've now made a larger 12mm crank for the regulator spindle, and I've fixed most of the leaking fittings apart from the steam brake valve which I think needs the mating surfaces lapping flat, so I'm nearly ready for the next test on the rolling road. Unfortunately after a week in the garage the steel platework has started to rust, perhaps because I covered the engine with a heavy dustsheet while there was still moisture around - the garage itself is well ventilated and other things don't rust there. The sooner I can get it painted the better.
1/8/08
I steamed the engine on the rolling road for the second time this morning - Ted came round to give moral support, but I did all the firing myself this time. I started the fire with barbecue charcoal soaked in white spirits, and built it up with the coal from our club which I'd sifted and rinsed to remove dust. The fire took hold well and I had steam pressure about 25 minutes after lighting the fire. I switched to the steam blower at about 25psi and the pressure quickly built up to 50psi. I then ran the engine both forward and backward for about 10 minutes. It sounded even better than on the first run, and the squeak that can be heard on the video of that run has disappeared - perhaps because the lubricator check valves are no longer leaking and so more oil is getting to the cylinders. The valve leakage also seemed slightly less. The reverser could be cranked back to less than 50% cut-off and the engine still ran smoothly. The longer crank on the regulator spindle gave better control and I don't think that I now need an emergency stop lever on the top of this crank for the first run on the track. I used the standard-sized 7mm nozzle on the blastpipe and the fire draught seemed fine - I probably hadn't built such an efficient fire as Derek did on the first run. The steam brake valve still leaked through the centre spindle even though I'd lapped the surfaces together - I think it must be getting past the screw holding the valve disk to the spindle so I'll have to dismantle it again. The steam brakes themselves worked well, bringing the wheels to a standstill against full regulator. Both Chiverton injectors picked up straight away at 50psi and lifted the water level rapidly.
I think I'm now more or less ready for a track test - I just need to make a proper towing clevis for the tender, and arrange a date with the boiler tester to do the steam test. I shouldn't have any problems demonstrating two independent ways of getting water into the boiler, so the main thing is to get the safety valves adjusted up to 90psi and hope that it passes the steam accumulation test which checks that the safety valves can cope with the fire burning under full blower.
2/8/08
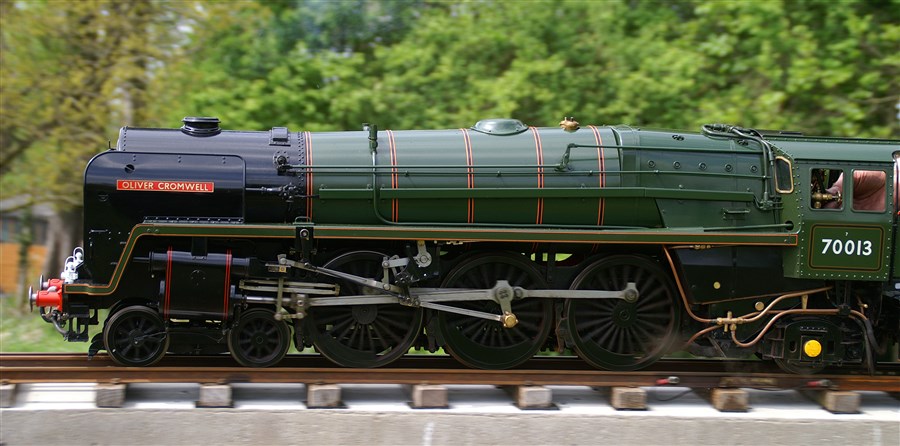
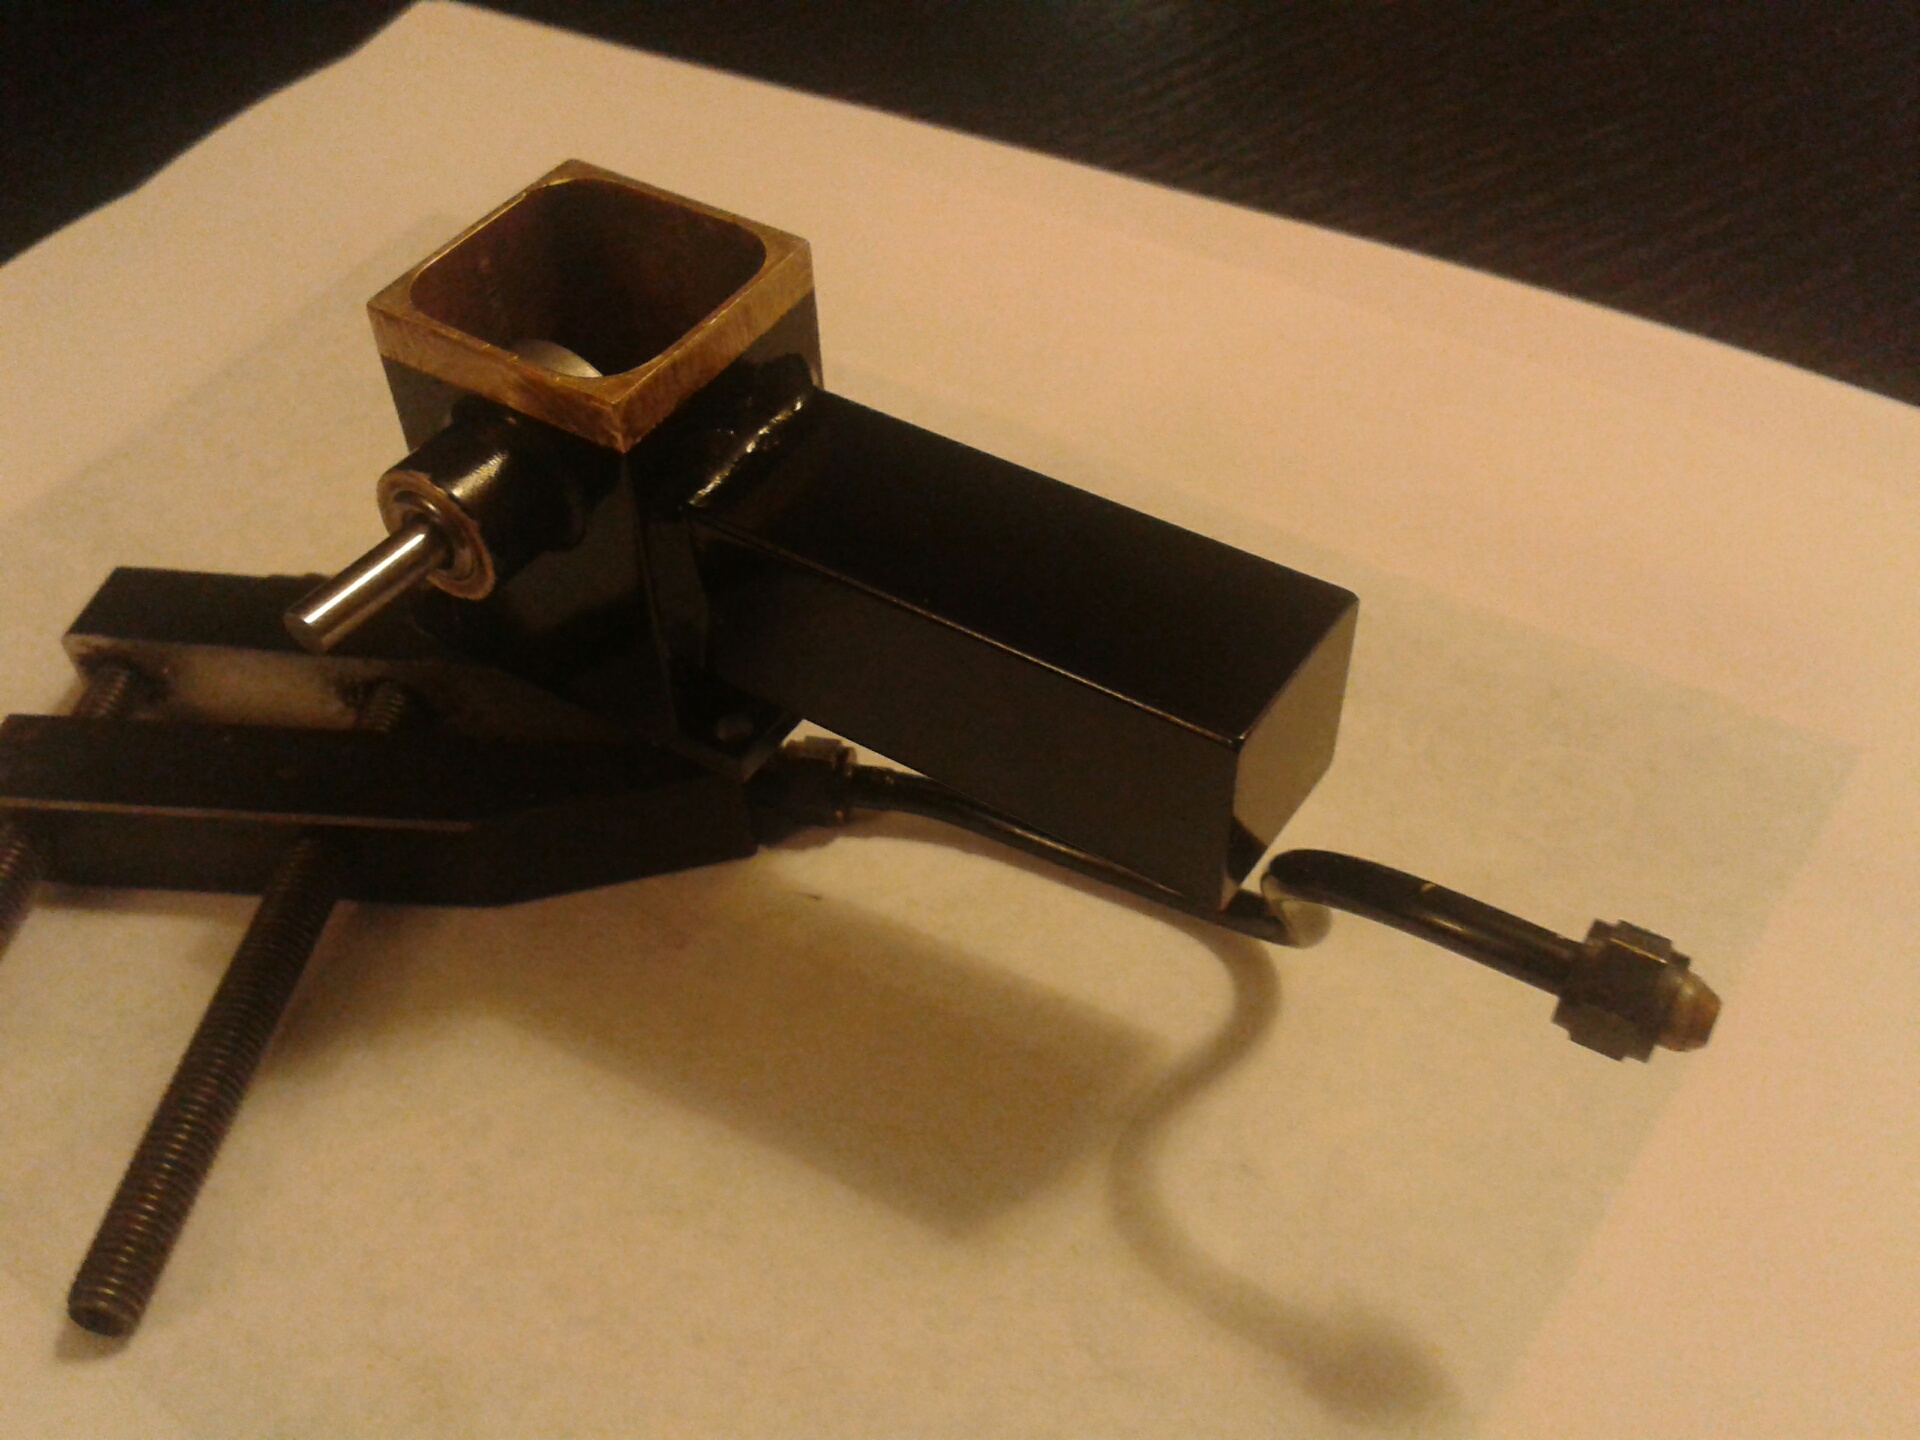
I asked Doug Hewson for his advice on PTFE valve rings and he sent me this photo which he has kindly allowed me to publish. It shows his modified bobbins and grooved PTFE rings for the Winson version of the Britannia. He says that the PTFE needs to slide into the bore with hand pressure without needing to be forced (it expands more than the metal at steam temperature) and that the seal is absolutely steam-tight, the loco 'gliding away without a sound'.
6/8/08
I've made a substantial rear coupling to attach the tender to the driving trolley, having been warned against 'putting all the load on a 2BA bolt'. The tongue is cut from a spare loco-tender drawbar and fits through the 10mmx5mm slot in the buffer beam from the inside - the buffer beam itself is fixed very securely to the stretcher with 8 countersunk screws. The block is cut from a piece of 15mm square bar with 5mm slots to take the tongue and the trolley's drawbar, both of which will be secured with 5mm steel pins. I'll sit on the front of one of the club's passenger trolleys to drive - I don't see any need for a driving trolley of my own, since the tender can carry all the coal, water and tools that I need. I've found an old rectangular polythene food tray that fits neatly in the bunker to hold the coal without scratching the paintwork, at least as a temporary measure until I can make something more elegant.
I had a letter from the Administrators of Modelworks this morning, which has been sent to all creditors, stating that there will be no funds available to make any payments to unsecured creditors. This is hardly a surprise. They have sold all the stock, IPR and raw materials with a combined book value of over �400k to the new Steam Traction World business for �50k. This sounds like a bargain for Dean and Steve, although I imagine that much of the stock has little value in reality.
9/8/08
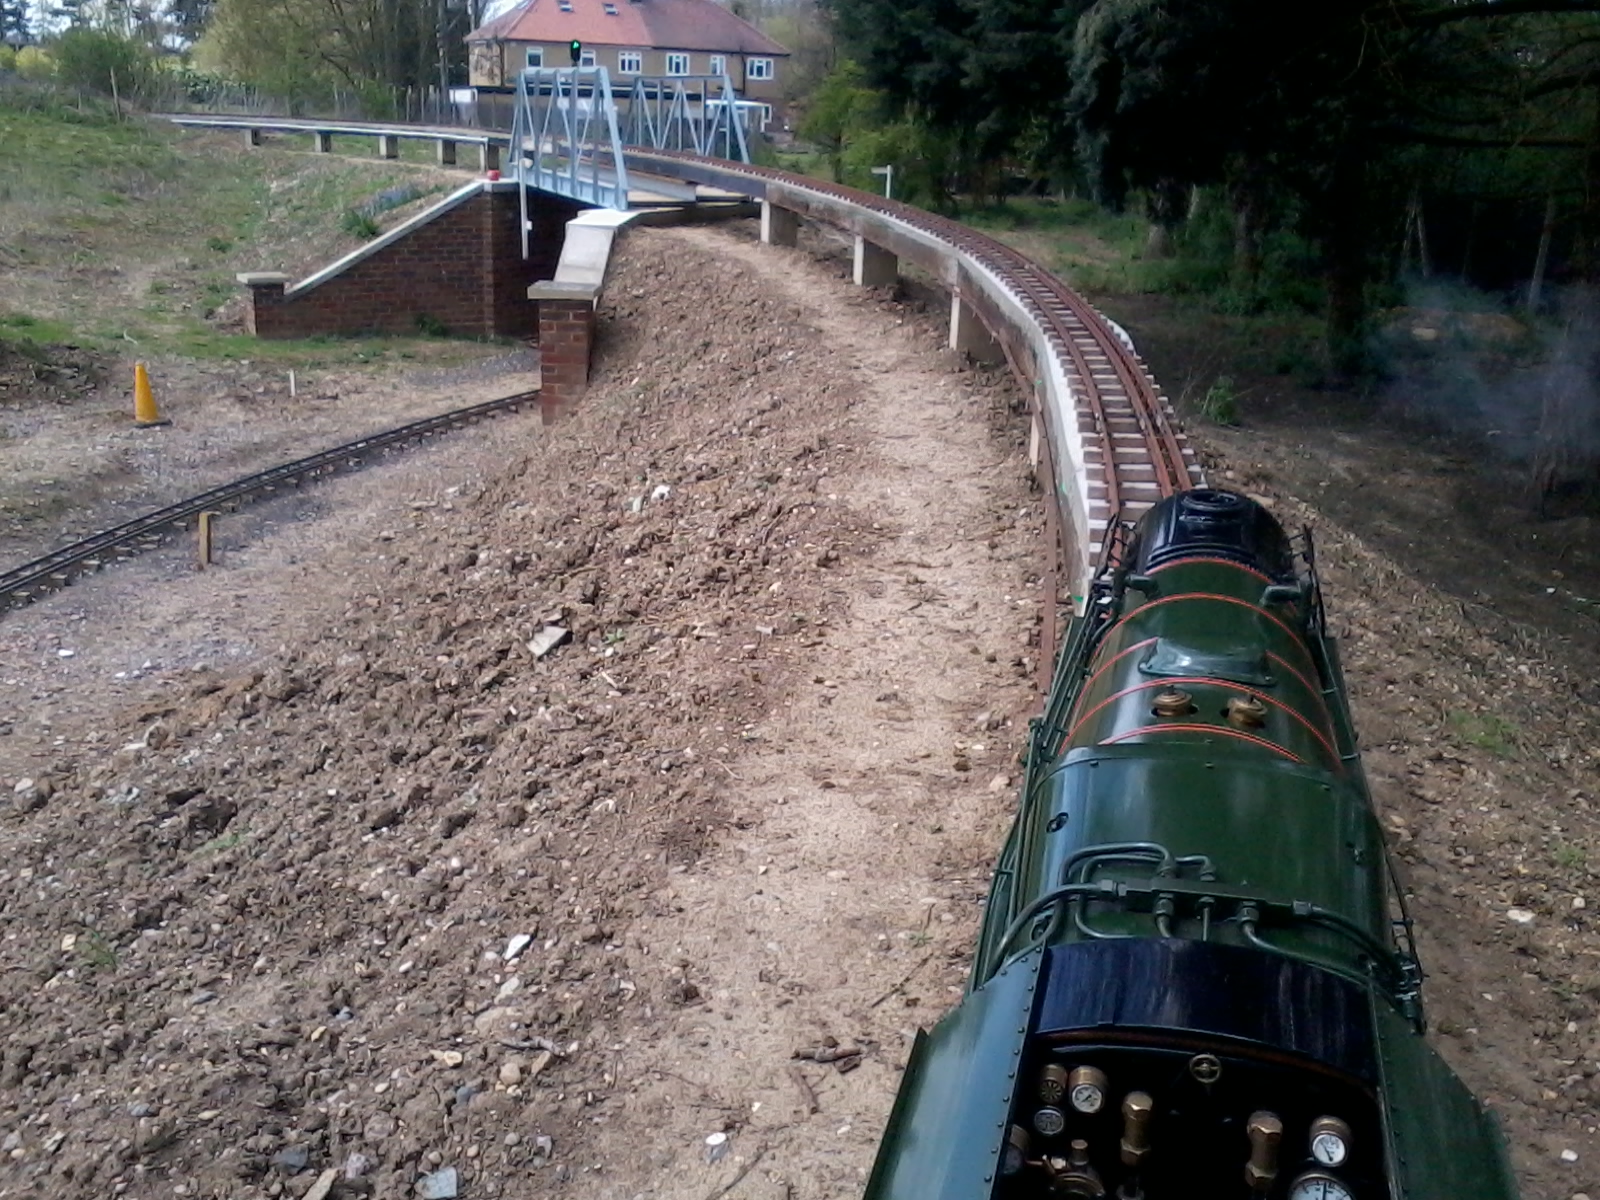
The photo shows me at the controls of Jon M's Gresley 2-8-0, which he very kindly let me drive this morning when he visited the North London club. This was the first time that I'd driven a large tender loco and so was good practice for my first outing with my Britannia - I found it actually much easier to drive than the smaller tank engines that I'd driven before, because the fire and the water level needed less frequent attention and there was time to sit back and admire the scenery. It also had extensions on the regulator lever and on one of the injector steam valves, which helped a lot. I fixed the dome cover casting with six 8BA bolts tapped into the cladding yesterday and so I'm now ready for the first track outing. I'll aim to do this during the coming week, assuming that I can line up expert assistance. Ted has kindly offered to transport me in his van, since we just have saloon cars at the moment - my wife's next car will be an estate, although she doesn't realise it yet. Ted is also almost ready to steam, and he plans to take his Britannia 'Lord Kitchener' to the track straight away without testing on a rolling road first, perhaps emboldened by the success of my first test.
13/8/08
With Ted's help I took the engine down to the North London track at Colney Heath today for its first outing. The weather was not good, but I couldn't bear to wait any longer. With Derek supervising we raised steam and moved the engine onto the track, and with Ted riding shotgun I cautiously opened the regulator and off we went. On the first lap the fire was not strong enough and we had to stop half way round to raise steam pressure again, on the second lap I made it three quarters of the way round before the same happened and on the third lap I managed a non-stop run with the same 60psi pressure at the end as at the start. This video clip taken by Derek shows the start of the third lap - there is a certain amount of wheel slip on the wet rails, and the leakage past the valve pistons can be seen from the blast of steam when starting. I still haven't adjusted the safety valves to allow the steam pressure up to 90psi - they are locked with a tiny allen screw and we didn't have a suitable key. I think that with 90psi pressure rather than 60 and a bit more practice at stoking the fire, I should be able to lap continuously without trouble. Anyway, I now have about 1.5 miles on the clock and I was very happy with the day's run. I'll now have to decide on the next step - whether to have another run with the safety valves correctly set, or to start straight away on the dismantling and painting. I probably won't be able to resist at least one more run!
15/8/08
A number of observations from the first outing, and some things that need fixing:
the controls are not easy to reach through the relatively narrow gap in the front face of the tender and under the bulkhead across the cab roof. If I hadn't already painted the tender I'd be tempted to cut away the top sides of the opening at an angle - as it is I'll probably just put some padding on the pointed top corners. I'll cut away the top of the cab bulkhead - I think that the cab will be strong enough without it. The regulator is reasonably easy to access, bearing in mind that I'd made a different bracket and moved it further back from the backhead, and fitted a thicker handle. Fitting the injector water valves at the rear of the tender was a definite improvement.
the shovel that I bought from Polly looks very nice with its polished brass blade, but the handle is not really long enough. The blade could also perhaps be slightly longer and wider - I was surprised at just how much coal I had to put on the fire. I lost the matching poker somewhere round the track, but this was just a length of bent 1/8" rod so I'll make another one.
the red-lined gauge glasses that I bought from Polly were a definite improvement over the clear glass provided, and made it very easy to see the water level.
despite two attempts to seal it, the steam brake valve was still leaking, this time through the exhaust pipe rather than the central spindle. I'll have one more go at fixing it, and if it still leaks I'll probably block it off at the input nipple for the time being.
there had been slight steam leakage past the injector steam valves when testing on the rolling road, but on the track the leakage from the left hand injector was much worse and it prevented the water getting through to cool it down and allow it to pick up. I suspect that the steam was leaking back from the top clack valve, so I'll have to dismantle this. The injectors probably also need cleaning now after three runs on hard tap water - Derek says that he cleans his after every run, by immersing them in diluted vinegar for 20 minutes.
the axle pump works well, but didn't quite seem to keep up with the rate of steam consumption - probably a combination of the valve leakage and the fact that I was driving in full forward gear all the time - I must try 'notching back' on the next run.
the lubricator reservoirs were almost empty after 3 laps (1.5 miles). Derek thought that the reservoirs were far too small for a loco of this size, but also said that they were delivering rather too much oil - the inside of the chimney was covered in a thicker mixture of oil and soot than strictly necessary. This is no bad thing while running in, but I could probably shorten the drive cranks on the expansion links at some stage to reduce the rate of delivery, which would also make the cranks look more realistic - this seems easier than dismantling the lubricators and fiddling with the spacer between the O rings, which is another way of changing the delivery rate.
I was surprised that the wheels were slipping as we pulled away, admittedly up a gradient and on damp rails, with only two people on board. I didn't realise that it was happening at first, until Ted pointed it out. I obviously need to cultivate a more gentle touch on the regulator, just as the drivers of the real Britannias had to do - they were notorious for slipping when pulling away with a heavy load.
the cylinder drain cock linkage jammed in the open position at one point, because I had pulled the knob in the cab floor up too far and the cranks on the valves were almost horizontal. I probably need to devise some form of stop to prevent this, or just not pull so hard!
the three hinged sections of the grate don't seem to work very freely - it needs some jabbing with the poker to get them to drop fully and release the fire after the pin has been pulled, and it's quite difficult to get them back up afterwards - the handle on the rear pivot rod doesn't give enough leverage. I think the problem is simply bits of ash getting stuck between the bars. However, once the engine is cold it's easy enough to poke a finger up through the ashpan shutters and lift each hinged section in turn as the pin is pushed back in.
24/8/08
I've cleaned the injectors by immersing them in a solution of citric acid crystals (87p for 50g from Boots), which I'm told is better than vinegar - half a teaspoonful dissolved in just enough hot water in a jam jar to cover the injectors. I removed the ball valves from the injectors but left the cones in place. I also dismantled the left hand top feed clack valve and tapped the ball down onto the seat, which hopefully will improve the seal. I might try Viton balls in place of the steel ones if I have further problems, although I've been warned that they can get jammed down the pipes. I've dismantled and lapped the steam valve yet again, and smothered the valve disk in steam oil. I've made a new poker from 1/8" stainless steel. I've removed the mesh guard from my hydraulic lifting trolley to allow the engine to sit more centrally on it. I've decided not to remove the top of the cab bulkhead at least for the time being, since another Britannia owner at the club thought that it would weaken the cab sides too much. I was reassured to see that his Britannia's wheels slipped when pulling away, even on a dry track! His suspension is much softer than mine, but I'm pretty happy with the stiff steel leaf springs on mine - I'm confident that they flex enough to spread the load evenly, and the engine felt very stable going round the track. I've bought a 0.05" Allen key from Chronos to adjust the safety valves, so the next step is to steam again either on the rolling road or the track and adjust the safety valves to give 90psi working pressure.
19/9/08
Ted tells me that he steamed his Britannia successfully at the North London track on Wednesday - I couldn't be there to take a photo because we were away. The engine ran well but unfortunately the front bogie derailed after a relatively short distance, which put an end to the session. Ted says that there is no weight on his bogie, so he's going to try putting some packing under the cups that slide on the bogie flanges. There does seem to be modest spring pressure on my bogie, so I'm not sure what the difference is. Barrie P, who built one of the original Winson Britannias (his superb 'William Wordsworth' was pictured on the Modelworks brochure) says that he has had bogie derailments in the past without serious consequences.
24/9/08
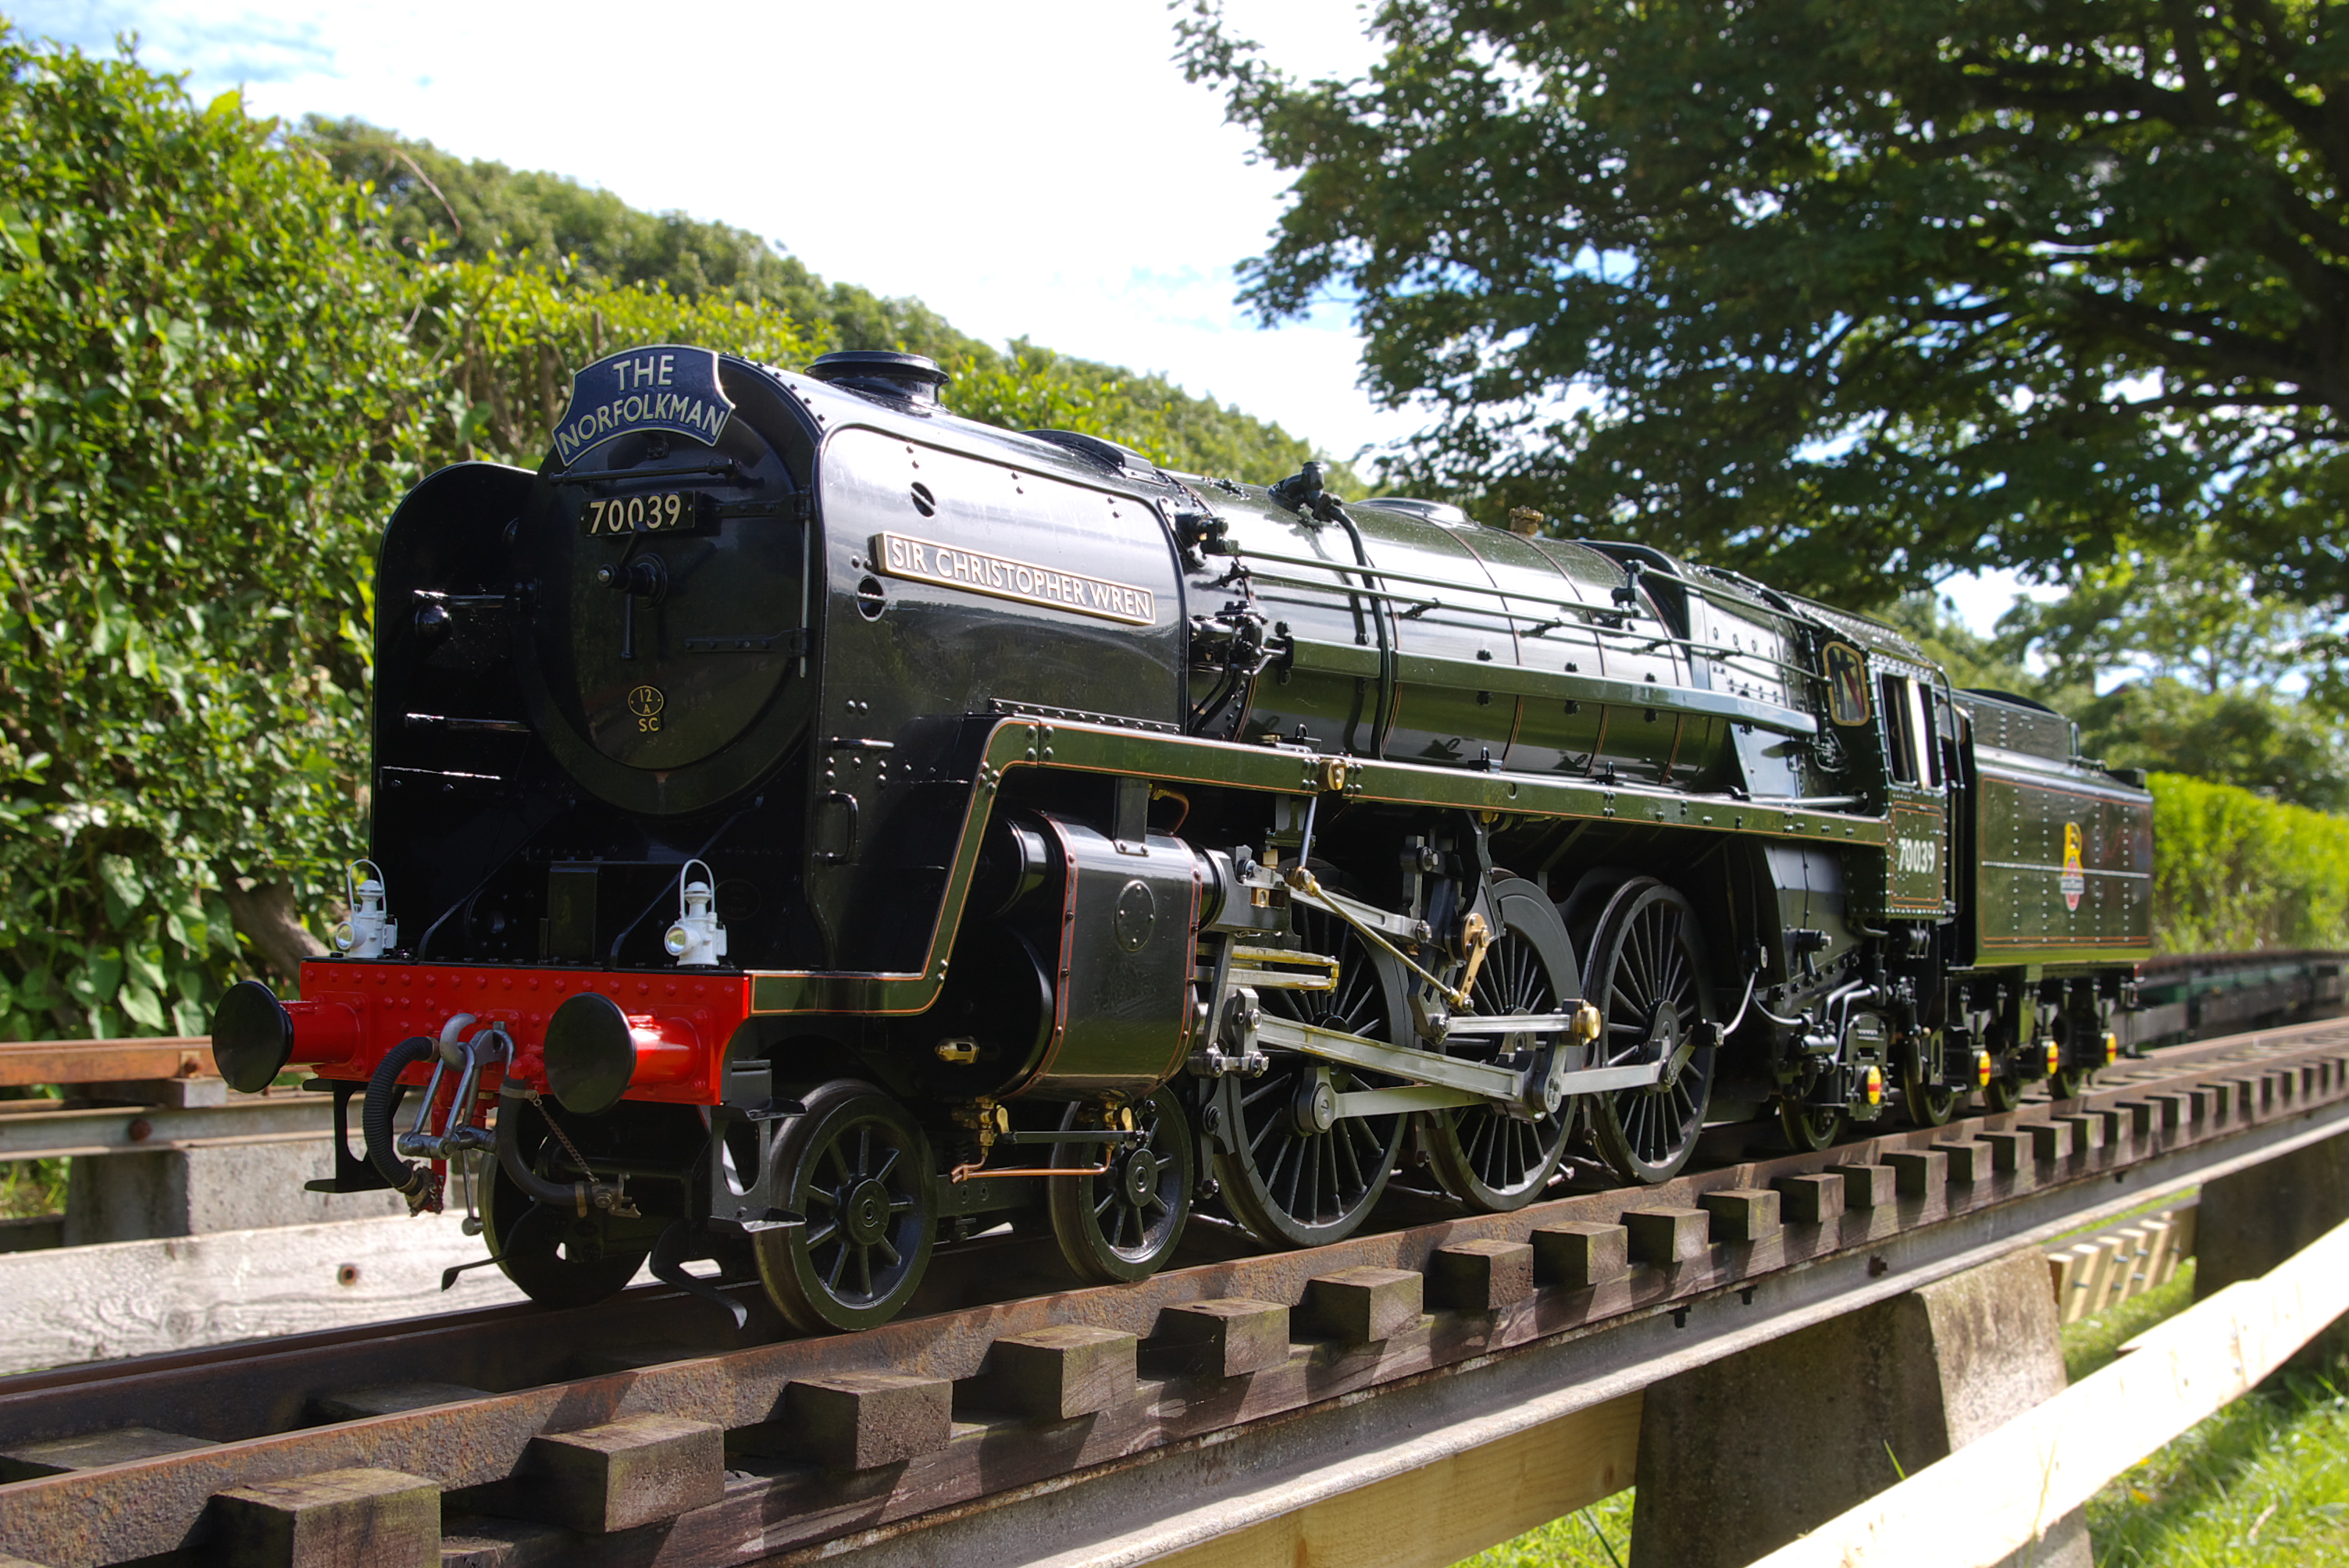
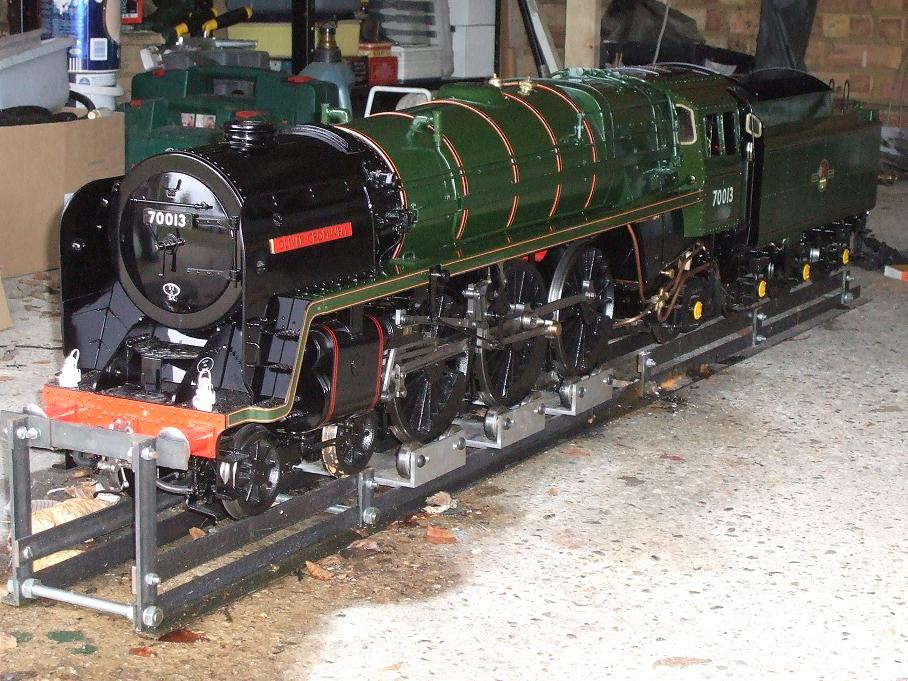
Rod A tells me that he had a successful first run last Sunday, doing three laps of his club track. The photo shows his loco 'Sir Christopher Wren' - note all the additional detail, such as the battery box, sandboxes, cylinder cladding, mudhole doors and authentic bolts and rivets. He also had a bogie derailment, but traced this to lack of sideways movement on the bogie - like me, he had fitted pins in the central brass block to stop the side springs falling out, but his pins projected further and limited the sideways travel to about 5-6mm. He has now trimmed them flush with the brass block and this cured the problem. He has replaced the Modelworks globe valves, whistle valve and clacks with better quality alternatives to avoid the leaks which both Ted and I have suffered, and has modified his piston valves to reduce the steam leakage - I'll try to get more details of this modification. He plans to continue running until the end of the year and will then dismantle in the spring for painting.
4/10/08
Ted steamed again at the North London track this afternoon and did a complete lap - he has soldered 4mm thick disks under the bogie cups to put more pressure on the wheels and this seemed to cure the bogie derailment problem. The photo shows the start of the run - he has left the cab and running boards off to give better access. The paintwork is all black at the moment - as indeed 70000 'Britannia' was for the first few weeks of its life - but he intends to paint it green later. One minor problem was that the whistle valve was leaking furiously because it was piped the wrong way round - the inlet side should be the elbow on the end of the valve but the Modelworks instructions show it the other way. We blocked off the outlet to get round this temporarily. With the full 90psi working pressure the engine ran very powerfully despite a bit of valve leakage, so hopefully mine will be the same when I adjust the safety valves up from 60psi. I'm not now planning to run my engine again until next spring - I've started dismantling it for painting. With at least three examples now running, I think we can safely say that the Modelworks Britannia does work well.
30/10/08
Rod A has sent me the following update on his 'Sir Christopher Wren':
"It has now completed about 12 miles, the longest run without a stop was two miles, six laps of our club track. I am gradually ironing out the teething problems and it is now running very well. As you are aware the regulator was stiff and difficult to operate, and in order to get some mechanical advantage at the handle, I decided not to increase the length of the lever at the smoke-box because it fouled the handrail, but instead I shortened the lower leg of the central pivot mechanism and made a new bracket to lower the rods slightly so they were parallel to the handrails [he has also fitted 4mm rods to cure the flexing]. The one way clutch in one of the lubricators started to slip very early in the trials and I found that it had worn a groove in the spindle, I replaced the spindles on both lubricators with stainless steel, a simple job using 4mm diameter rod and well worth doing I think. There seems to be little or no steam leakage from the piston valves, I am not an expert on the matter and will give it a little more time. I run it every Sunday and will continue to do so whilst the weather permits."
11/05/09
Rod has sent me another update on his progress:
"My loco is still running very well and has now done over 200 miles.
Regarding the leaking piston valves, my first attempt was to replace the whole bobbin with one made out of 'Fluorosint' - this is the ptfe with a very low coefficient of expansion, but to machine it accurately enough to get a steam tight seal was way beyond my capabilities, the result was very disappointing and no better than the Modelworks bobbins.
My second attempt was the Doug Hewson solution [see Doug's photo on 2/8/08 above], and I replaced the two brass piston rings with one made out of virgin ptfe. I made them a gentle push fit in the cylinder when cold, and when hot the expansion of the ptfe takes up any gap around the ring and creates a good steam tight seal. I made them from measurements first, then checked the fit in the cylinders and re-made each until I got a gentle push fit. I kept the same bobbins and end caps. This option works brilliantly."
"I encountered very few problems during running-in, but this weekend I discovered that two of the driving wheels had come loose on their axles. It did not cause any damage as the wheels are keyed onto the axles and did not move or disturb the quartering. I will score or cut a groove in the axle to give the Loctite something to grip and I will probably do all the driving wheels. As there is a fair amount of the loco to dismantle to remove the wheels and axles I have decided to carry on and undertake a full dismantle in preparation for painting.
Unfortunately I shall be unable to run this summer. I get a tremendous amount of pleasure driving the loco and intend to visit other tracks when the painting is complete."
7/7/10
Rod has now completed painting his 'Sir Christopher Wren' (Rod is an architect, hence the choice of prototype) and has steamed it again for 4 hours without problems. I think that it looks absolutely superb and the amount of additional detail is stunning - click on the image to expand it and zoom in on the details. It deserves to be in an exhibition.
15/9/10
Having completed all the painting, I moved the locomotive back into the garage yesterday with my wife's help for another test on the rolling road. It's exceptionally difficult to move it through the house - it's too heavy to lift, and has to be rolled everywhere on the jacking table and over various steps and other obstacles - so I'm thinking of cutting a 'cat flap' in the wall that separates the garage from the study where I did most of the building, so that I can roll it straight through from the display table into the garage for testing or transporting to the track. Yesterday I filled the boiler to the brim via the handpump and took it up to 60psi to check for leaks, which is the pressure at which the safety valves are still set. There were no serious leaks apparent, so this afternoon I enlisted Ted's help for a steam test. We lit the fire and raised steam, but found that the regulator valve would not close fully and the steam leakage prevented us from raising pressure. This was simply an error in my new regulator linkage, so I disconnected the linkage and closed the valve using the crank on the smokebox.
We then soon had working pressure and I opened the regulator and ran it in forward gear for a few minutes - it seemed to run very well and could be notched back to half cutoff or less. I then tried to move it into reverse, but the reverser linkage started to slip somewhere - I haven't pinned this problem down yet. We then noticed that the clutch shaft on the left-hand lubricator had worked its way loose from the internal cam, so this prevented any further running. The steam brakes worked but there is still a slight leak from the valve, so I will probably block this off. There's also a leak from the blowdown valve and I will replace this, and slight leaks from the clack valves and so at Ted's suggestion I will replace the steel balls with nitrile ones. So there's a little bit of work to do, but all in all it was a very successful first steaming after the painting and rebuilding, and I should soon be able to correct the faults, test again on the rolling road and then hopefully get down to the track again before the end of the season.
19/9/10
On further investigation I found that both lubricators had stopped working - they had both jammed so that their plungers could only be depressed half way, and the cams had worked loose from their drive spindles as a result. I dismantled the left-hand lubricator after removing the running board and discovered that the problem was a hydraulic lock caused by a ball of PTFE tape wedged into the outlet hole of the right-angled union on the end of the pump outlet. These unions are not very satisfactory because they cannot be screwed fully onto the thread of the pump outlet, otherwise the hole in the side of the union would be blocked - this is why I had assembled them with PTFE tape. I fixed the problem by degreasing the components and fixing the union to the outlet with Loctite on the thread. The outlet can still be rotated at the joint higher up to give the correct orientation for the delivery pipe. A thin locknut would have been an alternative solution, but I didn't have any of the right size (1/4" x 40 ME, I think). I also cut away the front of the bracket on which the lubricator is bolted to leave a U-shaped opening rather than a central hole, which makes installation and removal much easier. Hopefully the other lubricator can be fixed in the same way. I've also discovered that the problem with the reverser linkage is that one of the universal joints has broken - the plastic moulded onto one of the brass bosses has cracked and is slipping on the splined surface. The universal joints are made by Huco and I'll have to obtain a replacement. The reverser drive is fairly stiff when the motion is stationary, and it may be that these plastic couplings are not really up to the job, but I'll try one replacement before searching for an all-metal alternative.
28/9/10
I've now fixed the other lubricator - in this case I had screwed the bottom union too far onto the outlet and had blocked the exit as a result. I really should have tested the lubricators by hand before steaming. I've also bought a replacement universal joint from RS Supplies - rather expensive since they sell them in pairs and with postage it came to over �27, but I couldn't find any alternative supplier. At least I have a spare now. I've also hopefully corrected the regulator linkage, although I can't be certain until I steam again. I plan to steam once more on the rolling road soon, to check out these repairs and set the safety valves to 90psi, and then I'll aim to get down to the track at Colney Heath before the end of the season to get a steam test and try it out on the track. My wife and I still have saloon cars, but I've found that our daughter's Golf is just long enough with the back seats down to take the locomotive, so I've been making a wooden platform to fit in the Golf. I'll put some wooden strips on the board to locate the wheels, and the locomotive can be fixed down to the board securely by sliding a stout metal bar over the frames and under the boiler in between the middle and rear driving wheels, and then clamping this down with studs on either side. The tender can also be fixed down with a similar bar through the rear cutouts in the frames. B&Q sell suitable steel bar and studding.
2/10/10
I've steamed twice more on the rolling road - for over two hours today - and have ironed out most of the problems. I've set the safety valves to 90psi and tried an accumulation test with the blower full on, and the safety valves kept the pressure steady on the red line. Once the safety valves have blown off they seem to stay slightly open as the pressure falls, but a tap with the shovel cures this. There are still leaks from the blowdown valve and both injector steam valves, so I'll replace these in due course. Both injectors work nicely, right down to 25psi if the water valve is adjusted carefully. I've blocked off the steam brake valve. There's still a lot of steam leakage past the piston valve rings, and I'll need to replace these with PTFE at some stage as Rob did (see 11/05/09 above). The engine doesn't run as strongly in reverse as in forward gear and I think that this is because the locknuts that I put on the rear of the leadscrew are limiting the reverse gear movement too much - I'll need to find an alternative way of restraining the leadscrew because I don't want the load to be transmitted back into the universal joints. I had hoped to take the loco down to the track tomorrow morning, but the weather forecast is not good. We're then away on holiday for a week, but I'll try to get down to the track later in the month.
17/10/10
I steamed again at the track at Colney Heath this morning. The transport arrangements worked well, with me driving my daughter's Golf and my wife following behind at what for her was an unusually generous distance - perhaps not wanting to crash into the back of me and be responsible for damaging the train, although I suspect that she was more concerned about our daughter's car. I took a short length of rubber hose which fortuitously fitted over the water hosepipe nozzle at the track, so I was able to fill the boiler quickly through the connector for the handpump feed, without having to remove a safety valve or pump laboriously with the handpump. We raised steam quickly but unfortunately there was no boiler tester present to give the official annual steam test (although my hydraulic test certificate still has 2 of its 4 years left to run). However, since the track was closed to the public and there were no other trains running, I took a chance and put it on the track. It ran pretty well, although it didn't feel quite as powerful as when I ran two years ago before painting - perhaps the valve timing needs adjusting. There was also a squeak which we later traced to a leak of steam oil from the union under the left-hand lubricator - the oil was taking the path of least resistance and not pumping into the cylinder against the steam pressure. Not wanting to cause unnecessary wear, I took the train off the track after two laps and dropped the fire. No sooner had I done this when not one, not two but three boiler testers turned up! I might try to get another session in before the winter, although I'd really like to get a set of PTFE valve piston rings made before I steam much more.
24/10/10
I took the engine down to the track again today, and this time I was able to get the annual steam test done - it passed with flying colours, with both safety valves blowing furiously under full blower, and both injectors chirping merrily away. I had fixed the oil leak under the left-hand lubricator, but disappointingly there was still the squeak when the regulator was open - one theory from the NLSME elders is that the noise is not a squeak from lack of oil, but rather a whistling noise from steam leaking past the valve rings. I think the next step is to remove the valve pistons and get some PTFE valve rings made up.
30/10/10
I've removed the valve pistons, and they seem to be in a good state with a coating of oil. However, in comparing the Winson valves with Doug Hewson's PTFE rings (left-hand photo) with the Modelworks ones (right-hand photo, taken before the original assembly), it has dawned on me that the Winson version has the valve rings covering the full length of the valve surface with angled retaining shoulders that are not intended to be steam tight, whereas the Modelworks version has narrow rings within the length of the valve surface, and the cast iron bobbin and end caps thus need to be reasonably steam-tight in order to get the valves opening at the correct point. If the inner bobbin shoulder is too loose a fit, steam will start to leak through to the cylinder ports as soon as the inner edge of the ring starts to cross them. I've checked the dimensions against the Perrier plans (courtesy of Jim in Australia) and the overall length of 2" and the valve surface length of 0.312" do match the plans. The Winson rings are presumably 0.312" long. I think that the Winson/Hewson design is better, since the end of the PTFE ring would define the valve opening more precisely, but this would involve making new bobbins in the Winson style. My inclination is to start by making PTFE rings to replace the two narrow rings as Rod did and see how well this works, and keep in reserve the option of making complete new bobbins. I've ordered a 12" length of 25mm PTFE from Chronos at �13.65 and when this arrives I'll try to find someone to help make the rings. I'll need to transport the engine to the lathe, since the rings need to be tested for fit. I think the procedure is to bore out the PTFE and then keep turning and parting off rings until the correct easy push fit is achieved - it isn't really possible to adjust the diameter of a ring once it's been parted off.
5/11/10
Derek very kindly made me a set of PTFE rings this afternoon. I took the engine round to his workshop and we measured the bore at 0.868" and turned a ring to match. The first one was too tight - it could just about be forced in by hand - but the second attempt seemed just right, an easy push fit. We parted off 3 more plus 4 spares which may well fit Ted's engine, since the Modelworks parts do seem very consistent in dimensions from one example to the next. We're away this weekend but I'll try to run again on the rolling road sometime next week and see how well the valves seal. The NLSME track has now officially closed for the winter, although I may be able to arrange another run there at some point.
10/11/10
I steamed on the rolling road this afternoon to test out the PTFE valve rings, and they seemed to work very well. The squeak has completely disappeared, and there seems to be far less steam leakage. The engine runs evenly in both forward and reverse and will turn over slowly and steadily on a slight regulator opening, and will run with the reverser notched well back in both forward and reverse. This video clip shows forward running with a moderate regulator opening, and this video shows reverse running with a smaller amount of regulator. I left the running boards and smoke deflectors off, as I'll remove one of the valves tomorrow to see if the PTFE rings have reduced or eased at all. I really must replace those leaking injector steam valves! There's also a slight leakage from both rear cylinder drain cocks, and the axle pump has stopped working, presumably caused by one of the clack valves sticking. Ted came to watch and agreed that it sounded much better, but I'll need to test it on the track to be certain.
14/11/10
I fixed the axle pump yesterday by removing the bottom inlet fitting - the ball must have been stuck to its seat. It's very difficult to get at - it involves supporting the engine between two stands, crawling underneath and disconnecting the brake linkage. I took the engine down to the track again this morning - probably the last opportunity before the NLSME track is closed for maintenance over the winter - and the performance with the new PTFE valve rings was superb. The engine would pull gently away on the slightest opening of the regulator with hardly a sound, in both forward and reverse, and it felt much more powerful on the gradients and maintained its steam pressure all the way round the track. As Ted said, it felt like a different engine. I also tried pushing the engine along the track in mid-gear with the regulator open, and there was some steam escaping from the open drain cocks and the chimney. I think that this is because the PTFE rings are relatively narrow and do not cover the valve ports at all positions in mid-gear - steam can get through to the ports around the inner ends of the cast iron bobbin as soon as the rings open over the ports. It's not really noticeable in full gear because the bobbin moves so quickly to the fully open position. Full-width PTFE rings would probably cure this slight problem.
21/11/10
I went along to the NLSME track this morning to help with maintenance - we lifted parts of the raised track to replace rotting support beams, so I don't think that there will be any more running until the Spring. I probably won't update this site much more until then, although I'm planning to visit the ME exhibition at Sandown Park, probably on Saturday 11 December, and will report back on that. Rod tells me that he will be exhibiting his Britannia there.
17/2/11
I've been helping out with the Sunday morning winter maintenance sessions at the NLSME track - we are working on an extension to the raised track, and preparing for new steaming bays and a more efficient way of getting engines on and off the track. I've made a few improvements to my engine - I've fitted nitrile balls in the top clacks, extended the axle pump valve spindle further above the cab floor so that it's easier to operate, and modified the cab floor covering so that I can remove it without dismantling the cab doors. It will soon be time to start steaming again.
I see that 70013 is finally almost reassembled after the repairs to the rear corners of the firebox, and should be back in service on the mainline within a week or so. The second photo on this page shows the large sections that have been rivetted onto the rear corners. Meanwhile the newly-built A1 Tornado is out of service, also with firebox problems - the boiler has been sent back to Meiningen in Germany to have over 1000 firebox stays replaced.
28/3/11
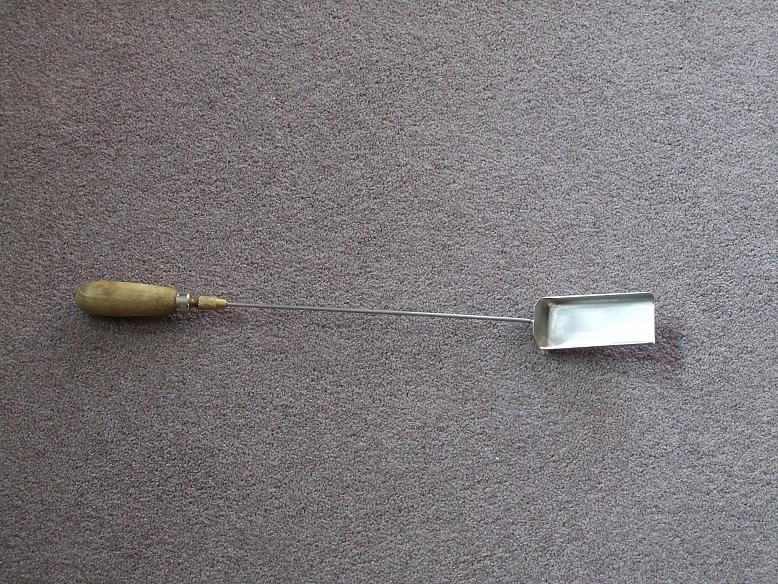
I've made a new larger coal shovel because the one that I bought from Polly some time ago was too small for such a large firebox, and the handle was too short. I did consider buying the version for a 7 1/4" loco, but with a width of 1 5/8" it would probably have been too close a fit between the firehole doors. The one that I've made is 1 1/2" wide by 3 1/2" long, with a 12" handle. I bent the shovel from a piece of 1mm stainless steel and silver-soldered the rear corners, and then silver-soldered a length of 1/8" stainless steel rod, and fitted a removeable wooden handle borrowed from a set of small files. It should enable me to stoke the fire much more easily.
I'll aim to steam again within the next couple of weeks, although I shall take care to choose a dry day - when I last steamed in the autumn, the track was wet and threw up rusty water onto the frames which took ages to clean.
17/4/11
I steamed at Colney Heath this morning, my first outing of 2011. It ran very nicely and the new nitrile balls in the top clack valves seem to cure the problem of steam leaking back through the injectors. The new coal shovel is a great improvement too. The only problem was that the axle pump had stopped working again - presumably a ball stuck on its seat again. This is not a showstopper with two reliable injectors, but rather annoying and I can't see any easy way of preventing the problem. I must make a spark arrester to fit in the smokebox, which is needed for public running days. No photos this time unfortunately, but I'll try to get a video clip sometime this season.
I see that Tornado and 70013 are also both now back in steam, after their firebox repairs.
18/4/11
I posed the question about the sticking axlepump on the MECH forum and got some useful ideas:
drill and tap the bottom of the pump inlet and fit a screw so that a prodder can be inserted to free the ball from its seat when necessary
join the outlet from the handpump to the inlet for the axlepump, so that the handpump can be used to free a sticking ball - I might make up a pipe to allow this
give the pump body a sharp tap with a hammer - easy to do when the engine is standing on the steaming bay, which gives access from underneath the track
I've ordered a square of stainless steel mesh from Polly to fabricate the spark arrester, which will essentially be a cylinder extending down from the rim of the petticoat pipe to the level of the blastpipe nozzle and blower. I'm also going to reduce the delivery rate of the lubricators - at the moment they are 2/3 empty after two laps of the track, and there is far too much oil in the chimney, and indeed in my hair. I'll do this by drilling extra holes in the cranks attached to the expansion link, to allow the throw of the pushrod to be reduced.
1/5/11
I steamed again this morning, and did 6 laps this time more or less non-stop, apart from a few red signals and a brief stop to take on water. I'm starting to get the hang of tending the fire while under way. The axlepump is working again, and the lubricators are much better with the crank throw reduced by about 50% - after 6 laps they were both about 2/3 empty, and the film of oily soot around the inside of the chimney was much more reasonable. I've fitted the spark arrester, although one of the club elders said that it wouldn't be totally effective because I'd left a gap around the blastpipe at the bottom of the mesh cone, so I shall have to think again before taking part in any public running. We had three Britannias side by side at the club this morning - mine, Tony D's old stalwart, and a very nice model that one of the members has purchased recently. I also spoke to Keith H who is building a Britannia using the Spink plans for the chassis and Doug Hewson's new drawings for the bodywork. Keith took a video clip of me driving this morning, so I'll add this to the website when he forwards me a copy.
4/5/11
Keith has kindly sent me this photo of me and my Britannia on the track, with the other two Britannias in the background. He's also sent me
this video which shows me starting off from alongside the steaming bays and then later coming round the back of the track towards the station. A certain amount of steam seems to be getting past the valves when the regulator is first opened, which I think may be caused by the delay while the PTFE rings heat up and expand to a close fit in the valve sleeve. Once the engine starts to move, there doesn't seem to be any significant loss of steam past the valves, although there's a bit of leakage from the left-hand cylinder drain cocks which I must attend to.
10/7/11
I steamed again today after a long absence during which I was hospitalised for treatment of a problem with the blood supply to my spinal cord, causing weak and wobbly legs. Hopefully it's all fixed now and I should gradually recover my strength. I managed three uneventful laps of the track - the engine could have done far more, but I was starting to feel the strain!
21/7/11
Rod A's Britannia, driven by Ben Pavier, won the IMLEC 2011 competition at Bromsgrove last weekend from a field of 22 competitors. IMLEC is a test of efficiency, measuring the weight pulled and distance travelled using a given weight of coal. This win is a tribute to Rod's building and Ben's driving skills, but also a strong endorsement of the Modelworks design and confirmation that the valve gear must be pretty efficient. The only change that Rod made to the mechanical aspects was to fit PTFE valve rings like mine, and also PTFE rings on the main pistons.
Rod tells me:
"The weather over the whole of the weekend was atrocious - we started off in
the pouring rain and after about a quarter of an hour it had stopped and we
were able to complete our run in the dry. The track was aluminium rail which
is not renowned for its ability to grip in the wet. In order to achieve a
good result it was our policy to get round the track for 25 minutes without
stopping! Although we had practiced several times on our steel track at
Southport with eleven passengers we thought it best to take only eight
passengers in total including Ben and the observer. In the event we managed
a continuous run of 12 laps of the track without slipping! Ben tells me he
drove the loco at an average boiler pressure of 50lbs/sq.inch with the
reverser notched back to almost mid-gear, very impressive as the track has
an 800foot long incline of 1 in 100, and finished with very little coal in
the firebox! We used 1.74lbs of coal and achieved an efficiency of 0.52% - not
a high figure, but enough to win the first prize. I don't think you can
compare the results to previous years - it's all a matter of comparison on the
weekend. We were up against some very serious opposition, a Duchess, an A1, and two
9Fs and we are very proud of what we achieved with a Modelworks kit!"
24/7/11
I did about 15 laps of the Colney Heath track today, my longest run to date by some margin. Everything worked well - I've cured the leaking drain cocks by Loctiting the operating cranks to ensure that both sides close at the same time. I've also made a minor cosmetic improvement by replacing the rather unsightly Allen screws holding the brass covers on the return cranks - I used 8BA brass countersunk screws inserted from the rear with brass nuts on the outside. The steaming efficiency must have improved because I now find that the boiler overfills if I leave the axlepump on all the time - prior to fitting the PTFE valves, it would only just maintain the level when running continuously. On getting back home I discovered that one of the intermediate buffers on the front of the tender had come adrift, so I'll need to dismantle the buffer body to repair this. It's probably a good idea to use some Loctite on the retaining screw, to avoid losing the buffer head on the track.
7/8/11
I steamed again today but had terrible trouble getting the fire going. I used wood soaked in white spirits but probably didn't use enough, or perhaps I heaped too much coal on too quickly. Once the fire has gone out it's difficult to relight by putting more wood on top without emptying the coal out first, which is difficult to do with the Britannia's grate. Eventually I got it going by raking the coal to the sides and building a new fire of wood and charcoal in the centre. I also borrowed another 6 volt electric blower which turned out to be much more powerful than my Steamfittings one which I run on 18 volts - I think mine may be getting clogged up with soot, so I'll have to dismantle it and clean it. Someone told me that the internal passages are quite small and prone to clogging.
By the time that I had eventually raised steam a shower of rain came along, and I'd previously resolved not to steam in the rain because of the mess that the rust-coloured water thrown up from the tracks makes of the wheels and frames. However, having spent so long raising steam, I did 5 laps and the engine ran very nicely. I'd removed some free play from the regulator linkage - including Loctiting the front crank which was a bit loose on its cross-pin - and this made controlling the power much easier. I've also found that it seems to run better with the reverser wound back a couple of turns - it still has ample power, feels smoother, and the blast through the fire seems stronger for some reason. Sunday afternoon was a public running session and I still haven't made a satisfactory spark arrestor, so I couldn't run any more once the public started to arrive. Our insurers are apparently quite particular about this, following an accident a few years ago when a child was burnt by a cinder.
11/8/11
I've now modified my spark arrestor to be a much closer fit over the blastpipe nozzle. I've also decided to have another go at fixing the leaking steam brake valve - I blanked it off when I first steamed because I was unable to stop it leaking through the spindle. I don't intend to use the brakes in anger because of the risk of locking up the driving wheels and wearing flat spots on them, but it would still be nice to have the brakes in working order. I plan to counterbore the spindle hole at the outer end and fit an O-ring, which will hopefully solve the problem. I've ordered a 3mm bore by 1mm thick O-ring (in fact I've ordered a box of 225 assorted O-rings, for the princely sum of �1.95 + p&p). Photo to follow when this arrives.
13/8/11
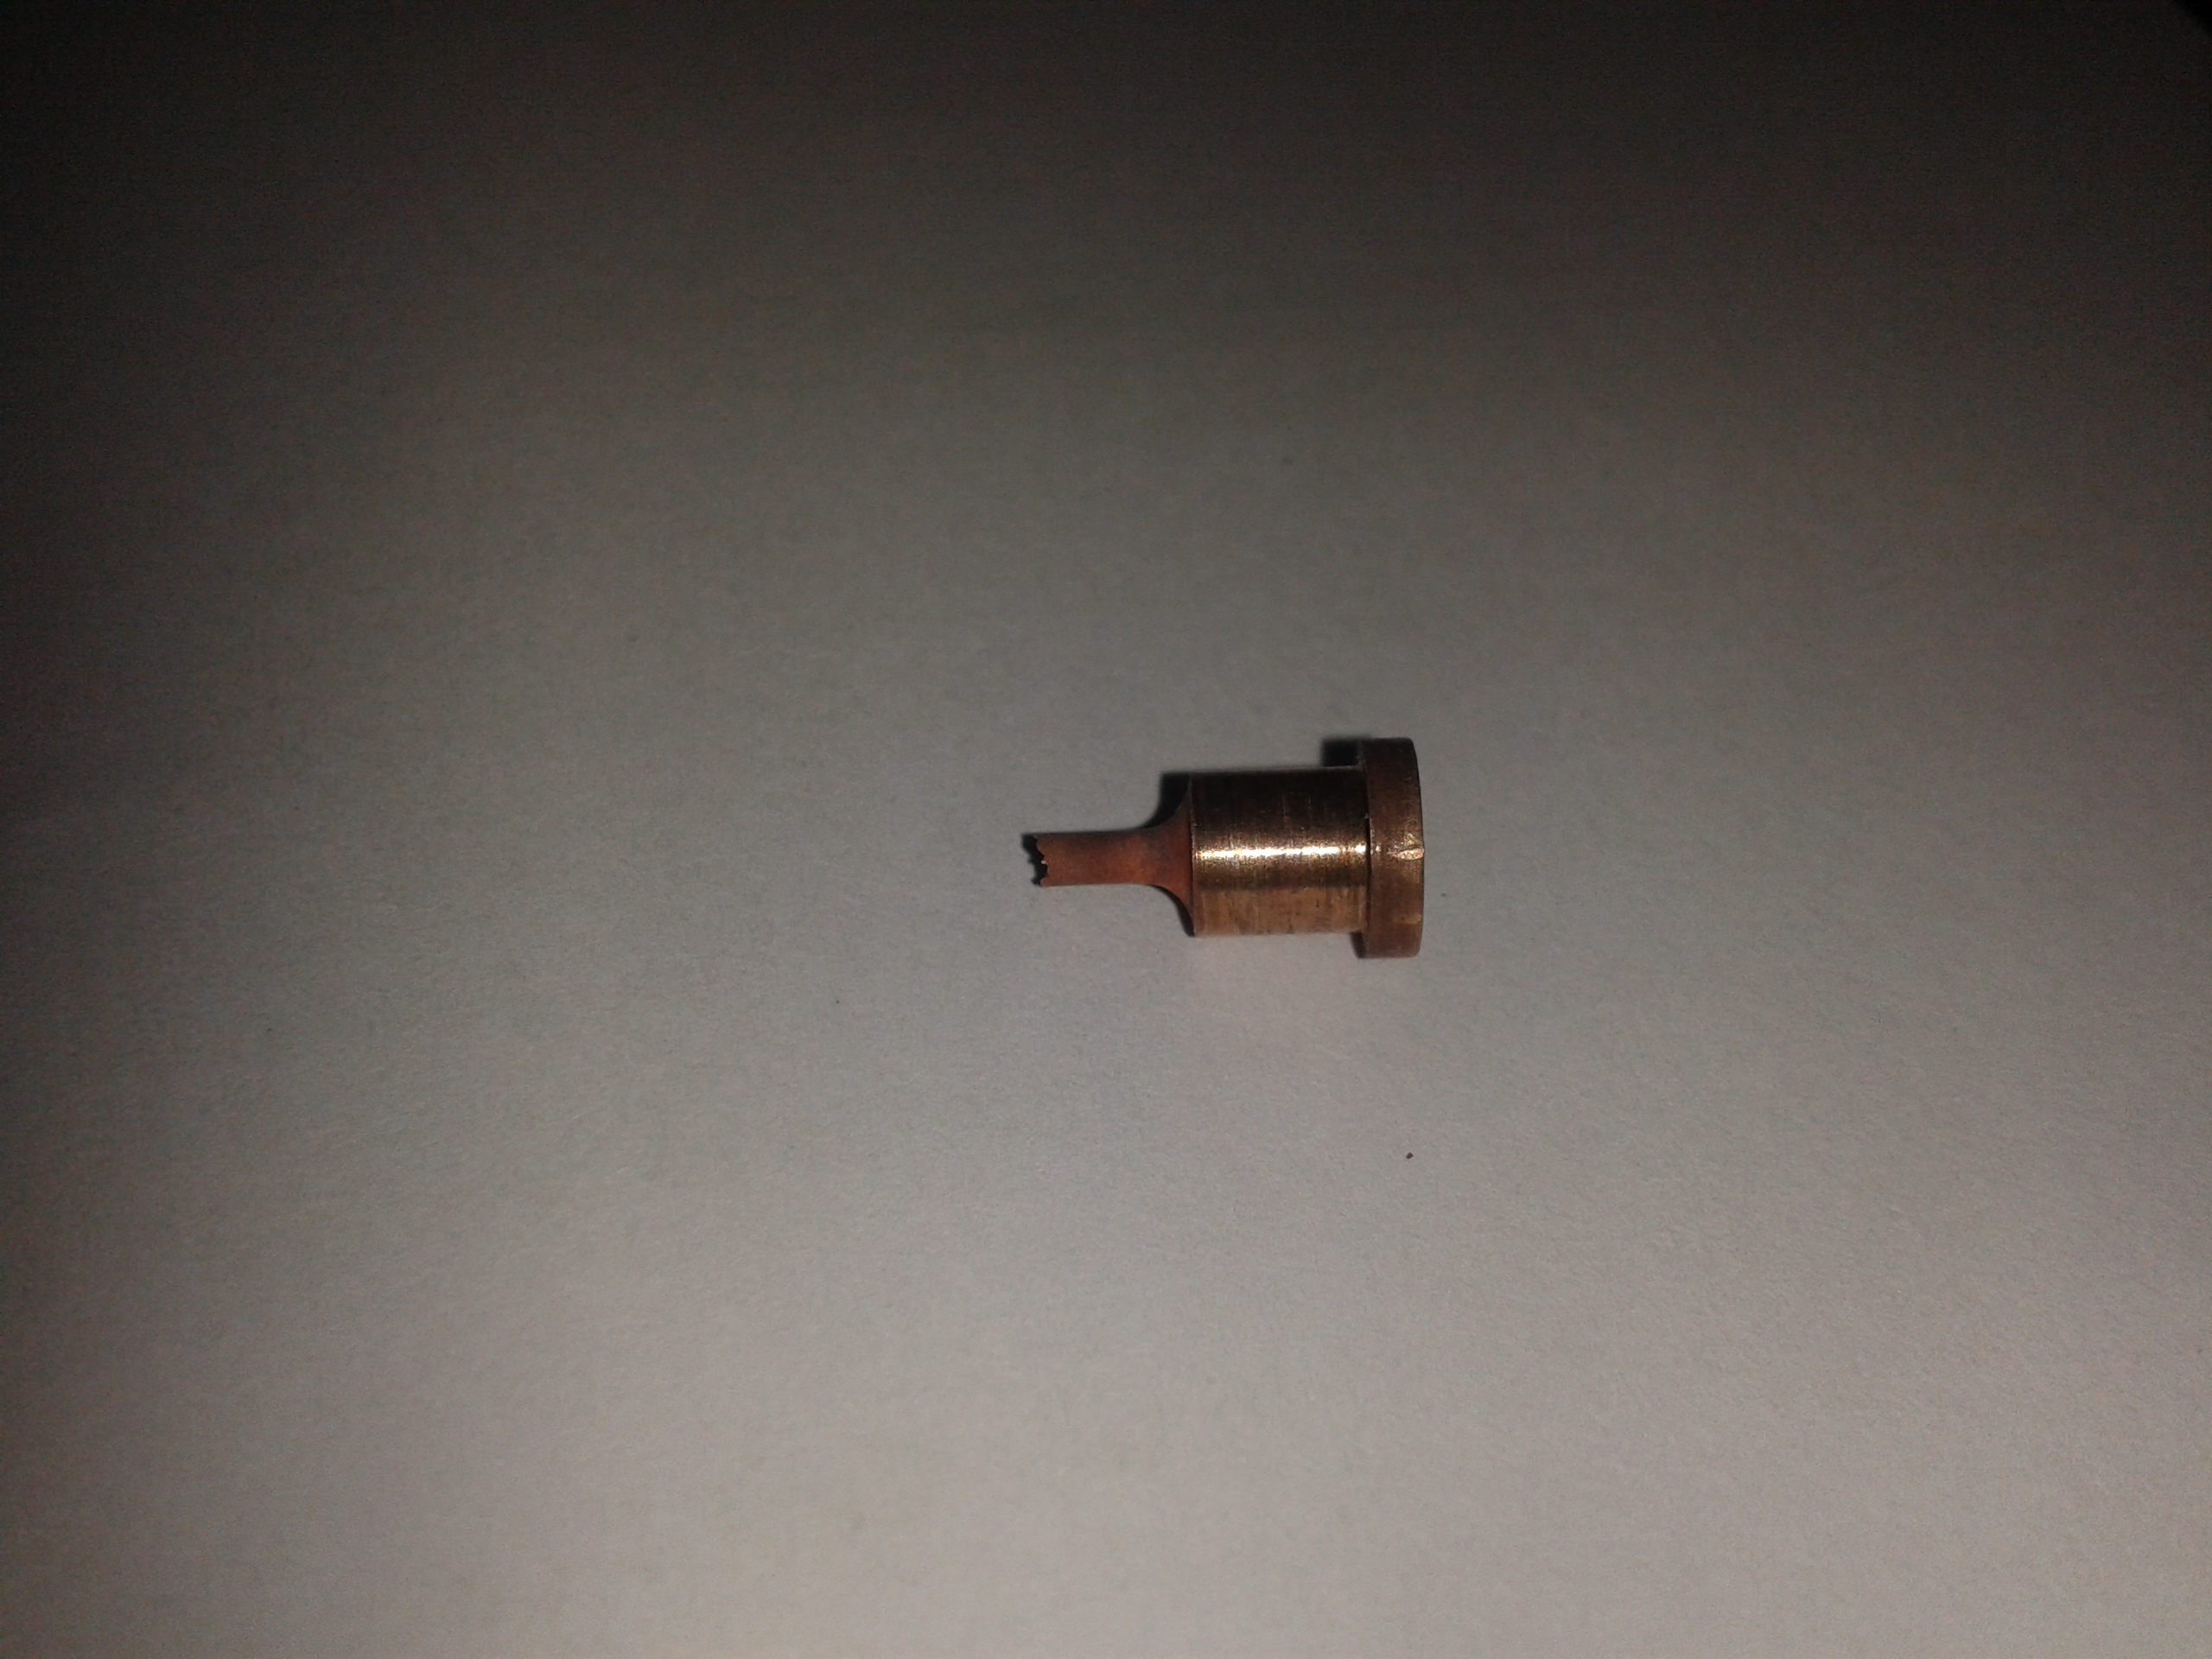
The O-rings have arrived, and I've fitted one to the brake valve body as shown in this photo. The remaining 224 should last a lifetime.
15/8/11
I steamed again yesterday and raised steam quickly using a lot more wood and charcoal soaked in white spirit to get the fire going - I had also cleaned a lot of soot out of my electric blower. It took about 25 minutes to get up to 20 psi at which point the steam blower takes over and raises the remaining pressure quickly. The spark arrestor seemed to work well. Annoyingly there was still a slight drip of hot water from the spindle of the steam brake valve, cunningly positioned to drip onto my hand as I worked the regulator, so the O-ring can't be a tight enough fit on the spindle. Perhaps a PTFE insert would be better. The brakes are extremely powerful - I applied them at walking speed coming into the station, and the wheels duly locked up and the train slithered to a halt. The brake piston has a cross sectional area of just over 3/4 sq", so at 90 psi that's a force on the piston rod of about 70 lb; the crank on the piston rod has roughly equal length arms and the levers carrying the brake pads give a mechanical advantage of about 2-1, so that's a total brake pad force against the 6 wheels of about 140 lb, probably comparable to the weight of the locomotive carried by the driving wheels. I don't know if the friction between cast iron brake pads and wheels is greater than that between wheels and steel rails - perhaps it is.
1/9/11
I steamed again last Sunday for about 10 laps, and gave my first ride to members of the public. They seemed to enjoy it, although for some reason the toddler thought that I should be wearing a teddy bear outfit. As I get better at stoking the fire, I'm often driving round with the safety valves blowing off continuously. The steam brake valve was still leaking slightly after replacing the O-ring with a PTFE insert. The general consensus seems to be that steam brakes should not be used to slow down the train - even with a graduated steam valve that allows the pressure to be varied, there is too much risk of locking up the wheels and causing flat spots. It does however make a useful parking brake and makes a satisfying hiss and puff of steam when the brakes are released. I had a problem with one of the lubricators failing to go round properly, and I think that this was caused by steam oil seeping past the spindle and into the one-way clutches, causing them to slip - someone confirmed that this can be a problem with this type of clutch. I've dismantled them, cleaned the clutches and fitted O-rings between the internal cams and the lubricator bodies, which hopefully will stop the seepage and improve the reliability.
12/9/11
I steamed again yesterday for a dozen laps and the engine was again running very nicely. When working harder with a couple of passengers on board the blast seemed too strong and the safety valves were blowing off continuously, so I might try fitting one of the larger blastpipe nozzles that Derek made for me several years ago when I first steamed - he said at the time that the blast was too strong, but it's only now as I learn to build a good fire that I can see the problem. The lubricators worked to start with, but one of them became intermittent after a few laps so I reverted to the longer crank throw on that side, which solved the problem. One of the injectors was rather temperamental and so I removed them today to clean them in citric acid, and discovered a dead earwig in the water inlet! It must have crawled into one of the open pipes while they were disconnected, because I have fine gauze filters in the tender. I'm quite impressed that the injector worked at all. I've made a lever fitting to replace the drain cock operating knob in the cab floor, which only moved up and down about 1/4" and was quite stiff - the lever gives a 4 to 1 advantage and is much easier to use.
19/9/11
I steamed at the public running session at Colney Heath yesterday afternoon, and was giving rides continuously for 2 hours - I must have done at least 20 laps. There were four trains on the track - two steam and two electric - and there were long queues of enthusiastic parents and children waiting for rides. The fire kept going well and I'm getting the hang of spotting when the boiler pressure starts to rise after an uphill stretch at full regulator, and opening the fire doors to prevent the safety valves blowing off and steaming up my spectacles. A heavy rain shower put an end to the proceedings at 4pm - the train in front of me stopped in some shelter, leaving me at a red light out in the open so I got soaked to the skin. Fortunately my passengers were better clad for the weather. Owen Chapman took a number of photos, one of which showing the engine glistening with raindrops at the end of the run is shown here. The full set can be seen on Owen's Flickr site
here. I still had problems with one of the lubricators working intermittently, and on dismantling it today I found scoring from the clutches on the drive shaft, exactly as Rob reported on 30/10/08 above, and so I've ordered a length of 4mm stainless steel to make replacements.
3/10/11
I steamed again at the public running session yesterday in glorious sunshine, and was persuaded to try pulling two coachloads of passengers. This went very well and the engine seemed to relish the extra load, storming up the gradients at full throttle. I did inadvertently let the boiler pressure get down to 30psi at one point and then we crept very slowly up the next gradient, but half a lap later we were back at the full 90psi - the pressure does rise remarkably quickly when the engine is working hard. Owen Chapman took a short video at the steepest gradient, shown on Youtube here - it's best viewed with the volume turned right up to appreciate the beat of the exhaust. Owen also took several photos, one shown alongside and the full set here (which shows yesterday's session and the previous one, with yesterday's first). I had replaced the shaft of the faulty lubricator in stainless steel, but it was still playing up - as in the previous session, it worked for about an hour and then became temperamental. It's the inner static clutch that seems to allow the spindle to slip back a bit before gripping, just enough to stop the cam going over the stiffest point. Once I get it home, it seems to grip instantly again!
10/10/11
I steamed again yesterday, mainly to let my son and daughter-in-law see the engine in action. Several people have told me that the lubricator spindles need to be hardened and exactly the right diameter if the clutches are to work reliably, so I've now switched to 4mm silver steel. This comes ground to size - I measured it at 3.99mm compared with 3.97 for both the stainless and the original mild steel. I hardened the silver steel by heating it red hot and plunging it into cold water. The one that I replaced before yesterday's run worked perfectly and the other one started to slip, so I've now replaced that one as well.
30/10/11
I went to the track with my wife Gaby this afternoon for what will most probably be the final run of 2011. The engine was running nicely, with no problem from the lubricators apart from too much oil in our faces. Now that they are working reliably, I need to try reducing the throw of the drive cranks again. I managed to break another of the nylon universal joints on the reverser gear drive by pulling against the rod while manoeuvering the engine, but luckily I had a spare. I will be helping out with projects at the track on Sunday mornings over the winter, including the extension to the raised track which is now well advanced. All in all it has been a very successful and rewarding season.
30/12/11
I've bought a pair of steel universal joints for the reverser gear drive to replace the plastic ones. They are available on Ebay here - remarkably good quality and value at �4.95 each + �2.00 postage, sent recorded delivery direct from China. They have one end drilled 5mm and the other 4mm, so the latter needed drilling out to 5mm. They are slightly shorter than the plastic ones, so I ordered a new length of 5mm rod - I bought 600mm of stainless steel on eBay for a few �s. It's nice to replace the plastic joints, which I feel rather spoil an all-metal model.
1/4/12
I took the engine down to the track this morning for its four-yearly hydraulic test, which it passed successfully. I replaced the safety valves by blanking plugs, filled the boiler to the brim and connected the testing equipment to a pipe feeding one of the clack valves on the backhead. I left the pressure gauge in place since it reads up to 150psi and I wanted to check that it agreed with the test gauge, which it did. We pumped the pressure up to 135psi, 1.5 times working pressure. There was a slight seepage from around one of the glass water gauges, which started even before I applied any pressure and which doesn't happen in normal operation when the boiler is at steaming temperature, but this was deemed to be OK and we didn't attempt to tighten the fitting. The front tubeplate in the smokebox and the inside of the firebox were inspected with a torch and no leaks were found. There wasn't time to steam up and do the annual steam test, so I'll get this done next time I steam.
15/4/12
I had the annual steam test done this morning, and then did a few laps of the track. I'm embarrassed to say that I let the fire go almost out on the first lap, and had to retire to the steaming bay to revive it. I put it down to lack of practice over the winter - a bit like the first sail of the season, when I struggle to remember whether to give way on port or starboard tack. Once the fire was rebuilt, I did 4 or 5 laps without further mishap - the engine is running very nicely. I'm going to order a bicycle speedometer/mileometer to fit to the tender - I'll report further on this when I've checked that it works.
18/4/12
I've now fitted the speedometer. It's this item on ebay - a wireless cycle speedometer/odometer for the princely sum of �6.85. I mounted the magnet on one of the centre tender wheels, with the wireless sensor fixed to a strip of steel screwed to the underside of the lower middle stretcher so that the magnet passes close to the sensor as the wheel rotates. The display head is fixed to a strip of metal at the front left of the coal bunker. The display can be calibrated for any wheel circumference - 270mm in this case. The instructions say that the display must be within 60cm of the sensor, but it seemed to transmit less far in this case - perhaps because of the amount of metal in the way. However, it seems to work in the position that I've chosen, even with the tender full of water. I'll need to try it out on the track to be absolutely sure. Wired versions are available even more cheaply and would remove any doubt on this score, but the wiring is perhaps a little unsightly.
6/5/12
Today was the first public running session of 2012 at the NLSME - the track is open to the public on the 1st and 3rd Sunday afternoon of each month from May to October. I steamed for about 2 1/2 hours and the engine performed very well. There were crowds of families queueing for rides despite the nondescript weather. The new speedometer didn't get a signal when mounted at the front of the tender, but worked when mounted on the ladder at the back of the tender. It showed that I was running at about 6mph, with a maximum of 9mph on the long downhill straight. The speed limit is 15mph, so I could try going a bit faster. I clocked up over 7 miles in total.
2/6/12
I steamed at a birthday party at the track this afternoon - these are held quite frequently on Saturday afternoons during the summer and raise valuable funds for the club. There was a huge turnout - the birthday boy must have invited his entire school. My Steamfittings electric blower was reluctant to start and on dismantling it I discovered that it was almost completely blocked by congealed soot - it runs much better after scraping it clean. I want to try and improve the whistle - it gives a rather feeble, strangled sound. I don't know whether this is a problem in the whistle itself, or the pipework, or the valve, and I need to try and localise the problem before investing in a more expensive chime whistle, so I'll remove the whistle and test it on compressed air as a first step.
8/6/12
I tested the whistle on compressed air and it sounded loud and clear down to pressures below 40psi, so I've concluded that the problem is most probably the long run of uninsulated pipe from the cab to the front of the loco allowing the steam to condense and lose pressure. I've moved the whistle to a position under the right-hand running board just in front of the cab, with the front of the whistle fixed to a bracket on the rear battery box mounting screw. This has substantially shortened the pipe run and there are no dips for condensed water to collect, so I hope that it will improve the performance - we'll see at the next steaming.
23/6/12
I steamed at another birthday party this afternoon. The repositioned whistle sounds much better - it's loud and clear at pressures above 50psi, so the pressure loss through cooling in the original long pipe run must have been the problem. Thanks to Owen Chapman for this photo.
2/7/12
I steamed at the public running session yesterday afternoon - there was a good turnout of about five steam locos and a couple of electrics, and the kids and their parents seemed to enjoy themselves. The engine was running well - I had cleaned out the spark arrestor which was clogged with soot after the last run and that seemed to make a difference. My session ended after a couple of hours when the lever arm on the fire doors snapped off - the silver-soldered joint that I had made at the angle in the arm didn't seem to have flowed very well and had obviously flexed apart over time. I've also noticed that one of the tender wheels has come loose on its axle - I spotted this because it had moved outwards and the paint had been scraped by one of the horn keep bolts. I've now dismantled this and re-made the Loctite joint. This was relatively straightforward - I just hope that the driving wheels don't suffer the same problem! Finally my wireless speedometer has stopped working and I've discovered that the tiny 12v battery in the transmitter is flat, so I've ordered a replacement (2 for �1.49 on eBay). This has only lasted a couple of months - I hope it was just a matter of the product being on the shelf for a long time before delivery, and not an indication of the normal battery life.
8/7/12
IMLEC 2012 is next weekend, 13-15 July, at the Nottingham SMEE. Rod and Ben are competing again with Rod's Modelworks Britannia "Sir Christopher Wren" and as defending title holders they get the last run of the competition at 4pm on the Sunday. Ben sent me this video of Sir Christopher storming round their home track at Southport.
20/7/12
Rod has sent me the following note on a very successful run at IMLEC 2012:
"The IMLEC competition was held at the Nottingham Society of Model and Experimental Engineers at their track at Ruddington. Ben entered the competition driving my loco, Sir Christopher Wren, to defend his title which he won at Bromsgrove in 2011.
The weather over the weekend was much better than last year. The track was aluminium rail with a maximum gradient of 1 in 190 and the passenger trucks were extremely free running. As we were the last of the competitors to run we had an opportunity to see how the others entrants coped with the loads they had chosen. We decided that, to stand any chance of winning, we had to pull a total of 20 passengers and complete 30 minutes of continuous running. There was a gradient from the start line in the station and we knew if Ben could pull away from the station he should be able to do his run without stopping. In the event he completed nine laps, the loco did over 800,000 ft.lbs of work and used 2.77 lbs of coal. Ben�s efficiency was 2.66% giving him a very creditable second place. Unfortunately we were unable to retain our title but the winner had won the event on four previous occasions so we were not too disappointed."
2/9/12
I steamed again today after an absence of a couple of months - we've been spending a fair amount of time on our boat, despite the nondescript weather, and we also had our younger daughter's wedding a couple of weeks ago. This afternoon was a public running session (they are now on the first and third Sunday afternoons of the month) and was very well attended, with half a dozen steam trains running and long queues for rides. I steamed for a couple of hours and the engine was running very nicely. I'd like to try hauling more passengers, having seen the video of Sir Christopher Wren pulling away (with some difficulty) with 20 people, but the club only has about 6 passenger cars and so we were rationed to one each this afternoon.
1/10/12
I steamed again yesterday - it wasn't a public running day, and I had the track to myself. The engine was running well but the transmitter battery in the wireless speedometer had gone flat again after three months, so I've ordered a wired speedometer to replace it.
7/4/13
I went down to the NLSME track this morning to help with the final stages of building the extension to the raised track. It looks magnificent and I can't wait to have a drive around it. We were fixing the anti-tip rails around the sides of the track (they catch the insides of the passenger trolleys to stop them tipping too far) and it looks to me as though there's a few more weeks work to be done before the track can reopen for the new running season. My engine is ready to go, complete with a new wired speedometer in the tender. The only improvement that I'd now like to make is to fit a new reverser screw with a coarser left-hand thread, so that the reverser handle turns in the right direction and takes fewer turns from mid-gear to full gear. I've emailed Mike Hewson to ask if the 12 tpi screw that they made for the Winson Brit will fit the Modelworks version, but I haven't had a reply as yet.
21/4/13
I was down at the track again this morning - the new extension is almost finished. This photo taken from the junction with the old bottom loop shows the extent of it, with the bridge over the ground level railway. I'll aim to take my engine for a run on it next weekend or the weekend after. I had a reply from Mike Hewson saying that they were out of stock of the reverser screws and not likely to get any more this year, and someone else told me that they don't fit the Modelworks Brit anyway, so I'll have to think again.
11/5/13
I took my engine down to the track last Sunday for the first public running session of 2013, and had my first drive over the new extension. This video taken from my mobile phone shows the drive up the approach to the new bridge at the bottom end of the site. The engine was running well, although the axle pump wasn't working - the inlet ball valve must have stuck to its seating again. I've tried pumping water into it via the tender handpump but this didn't release it, so I'll have to support the engine across two benches and crawl underneath to get at the pump. Or I could just ignore it - the two injectors work perfectly well.
21/5/13
I fixed the axle pump by removing the bottom fitting and cleaning it in citric acid, and steamed again at the public running session on Sunday. Everything was working well. Owen C took lots of photographs of me and other drivers at Colney Heath on Saturday and Sunday, shown here. One nice closeup of my engine at speed is shown here - the speed can be detected by the slight blurring of the track as Owen panned the camera to keep up with the engine.
27/6/13
I took my engine down to the track today for its annual steam test, which it passed without any real problems - I had to ease off one of the safety valves slightly to keep the pressure from going over the red line. The steam test certificate comes on the new-style form complete with a 'Written Scheme of Examination' to satisfy the Pressure Systems Safety Regulations 2000. I then did a few laps of the track and I noticed a slight squeak or whistle in time with the exhaust beat when the regulator was part open. I think this is a steam sound rather than a mechanical squeak, and it probably means that the PTFE piston valve rings are starting to leak - I had the same noise with the original brass rings before fitting the PTFE ones in 2010. I'll have to dismantle the valves and take a look at the end of the season.
5/8/13
I ran at the public running session yesterday afternoon, and it's just as well that I decided to go as there was only one other steam loco running, plus two electrics, and long queues of hopeful passengers. I pulled two carriages and perhaps should have volunteered to try with three. The engine definitely runs better with the heavier load - the bark of the exhaust sounds magnificent as it climbs the gradients and the fire is drawn up much more strongly. Strangely, the squeak that I reported last time had disappeared, so perhaps it was not a problem with the valve rings after all. I've discovered that I can free the bottom ball valve on the axle pump by passing a thin rod through the spokes of the driving wheel and giving it a sharp tap, so I now do this as a matter of course before steaming. I also noticed that other drivers pass a steel rod through the spokes of a wheel as a parking brake when the engine is on the steaming bay - I shall start doing this as a precaution. The axle pump seems less effective now than it used to be - I have to use the injectors twice on each lap to supplement it - and it may be that the O-ring is wearing out.
1/9/13
Brian H from the Fareham club came to visit me yesterday to have a good look at my engine. He is also building a Modelworks Britannia and has his chassis running on air and is now working on the boiler cladding. He is using the Doug Hewson cab kit which he says fits very well. He has also fitted Doug's reverser screw and said that it works well with only a minor modification to the rear end (see 21/4/13 above). We went down to the track for a quick steam-up but found it very busy with a visit from the Gravesend club - we saw a Winson Britannia running very nicely. I had some trouble getting the fire going and by the time I eventually raised steam at about 4pm we more or less had the track to ourselves, so managed a quick three laps to show Brian how it ran.
9/3/14
Tempted out by the glorious weather, I took the engine down to the track for its first outing of 2014. There was a birthday party going on there, enjoying the spring sunshine. However, I completely failed to get a proper fire going and gave up after three attempts over two hours. The coal did catch fire but failed to spread across the entire grate. The water just about got to boiling point but I couldn't raise any pressure. Next time I'll take some charcoal soaked in white spirits as well as wood. I've used this in the past and it worked very well, but more recently I've been in the habit of just using wood soaked in white spirit. The NLSME site is looking very good and the extension to the ground level railway is pretty much completed, with a loop under the new raised track extension and a new tunnel.
30/3/14
After the last unsuccessful attempt to raise steam I discovered that the inside of the electric fan was almost completely clogged by hardened soot. It worked much better after being carefully scraped clean. I also used charcoal soaked in white spirits along with wood to get the fire going this time, and I had steam raised in about 25 minutes. Despite the warm weather almost everyone left the site at 12 noon at the end of the Sunday morning working party session, and I thought I was going to be left on my own. I think it's against the rules to drive with nobody else present, and I certainly wouldn't be comfortable doing so, but Steve very kindly offered to stay on while I did a few laps. The engine seemed to be running very well - the only problem being a flat battery in the cycle speedometer. So I'm all set now for the public running season, with the first session on the first Sunday afternoon in May.
4/5/14
I ran today at the first public session of 2014. The weather was fine and there were crowds of visitors, some picnicking on the grass. The new ground-level track was taking passengers for the first time and so the queues for the raised track were not as long as they were on sunny days last year. My Brit was running nicely and I steamed for over two hours.
20/5/14
I ran again on Sunday - another warm sunny day with plenty of visitors. I had a bit of trouble with both injectors failing sometimes to pick up, which I've never really suffered before. I thought it might be because the boiler pressure was a bit high - it was creeping up towards 100psi - so I eased off the safety valves to lift at about 75psi. However on checking afterwards I found that there was quite a bit of scale in the tender tank which was partly blocking the gauze water filters, so I removed the coal bunker and descaled the tank with citric acid solution and cleaned the filters. Hopefully this will improve things for next time. Several people were taking photos and videos, so I hope to be able to add some of these in due course.
6/7/14
I steamed again this afternoon at the public running session and there was a good turnout despite the competition from Wimbledon, Silverstone and the Tour de Yorkshire on the television. The injectors seemed to work well after cleaning the tender tank and filters. The ground level railway is now back in use and very busy - this photo shows the main station with its three platforms and two trains queueing to reverse in at the end of their run and unload their passengers.
18/8/14
I steamed at the public running day yesterday and the engine was running nicely, except that I forgot to free up the bottom valve in the axle pump so the pump wasn't working. The ball always seems to stick to its seat after the engine has been left standing for any length of time - a sharp tap with a hammer and metal rod through the spokes of the front driver to the side of the pump body frees it up. It can be checked by placing a rubber tube on the inlet pipe and blowing through it. The injectors were working well and I can see why experienced drivers don't bother to fit an axle pump. Owen C took this photo on the climb up from the bottom bend. My annual steam test certificate expires in a few days' time and I wasn't able to get an impromptu test yesterday, so I'll need to pre-book this before I can run again.
22/8/14
I had the steam test done yesterday. There was no real problem, although there was some doubt as to whether the tender handpump was working because the resistance to pumping against boiler pressure didn't seem strong enough and we wondered if the inlet ball valve was stuck as is often the case with the axle pump. It may be that there was an airlock in it, because it was pumping OK (admittedly not against boiler pressure) when I got home. I'll have to check it again next time I steam. I didn't bother to drive the engine since I'd done so on Sunday and it saved having to polish the oil spots off the paintwork again. I now find taking passengers on the public running days much more satisfying than driving around on my own, with the shrieks of delight from the kids as we go through the tunnel.
8/9/14
I steamed for two and a half hours at the public running session yesterday afternoon, which was very well attended. Robert R from Epping came over to watch - he has nearly finished building his Modelworks Britannia and hopes to have it in steam soon. Owen C took
this video of me driving over the bridge on the new extension, with a ground level train passing underneath.
9/9/14
The axle pump has become gradually less effective - it's difficult to know exactly how much it is pumping into the boiler, but I have to use the injectors on every lap to keep the water level up. It delivers plenty of water back to the tender when the bypass valve is open, so I assume that the problem is a worn O-ring on the piston which lets the water past under pressure. Today I removed the pump piston, which was an exceedingly awkward job. I positioned the loco with the front end on its storage track and the rear end on the jacking trolley so that I could lie on my back underneath the gap and reach up into the frames. After removing part of the brake gear and the pump inlet pipe I was able with some difficulty to undo the bolt that holds the piston to the crank - this can just be seen in the photo. Then with the eccentric at its rearmost point and after unscrewing the end cap it was just possible to withdraw the piston without undoing the pump body from the stretcher. The O-ring looked in good condition, but it didn't project above the piston surface or offer any resistance so it must have been worn. Fortunately I had a spare which Modelworks must have provided and this did drag lightly in the pump bore. I won't be able to tell whether this has solved the problem until I next steam - fingers crossed!
5/10/14
I steamed up for the public running session this afternoon and the axle pump with its new O-ring seemed to keep the water level up, but after a couple of laps the engine started to feel rather jerky, with something squeaking and binding tightly once per wheel revolution. I thought at first it might be the axle pump, but the effect was the same with the bypass open or closed. The problem got rapidly worse and the binding became continuous. I had to abandon the run and take the engine off. I could hardly push it along the track, when normally it can be pushed with one finger. Once it had cooled down in the steaming bay it was much freer. When I got the engine home I removed the little end pins from the connecting rods and found that the left hand piston rod was really quite stiff, whereas the right hand one slid very freely. I oiled the piston rod and squirted some oil down the blastpipe, and the rod soon freed up completely. I think what had probably happened was that the steam oil supply from the pump was less than normal because the roller clutch was slipping a bit, and also I think that I forgot to oil the piston rod when steaming up as I normally do. It's difficult to be certain, but I think the combined lack of lubrication may have caused the PTFE collar in the piston gland to overheat, expand inwards and bind on the rod. I will move the lubricator drive rod out to the outermost hole on the expansion link drive crank to increase the lubrication. I'll try and steam again soon, either on the rolling road or on the track, to make sure that the problem isn't still there.
9/10/14
I've decided to enlarge the lubricator tanks to save having to refill them every few laps. I've ordered a length of 3/4" square brass tube on eBay, and I will cut a 3/4" square hole in the forward-facing side of each lubricator tank and solder in a 2" length of tube along with an end plate. These extensions should be practically invisible underneath the running boards.
23/10/14
Just back from a week's holiday and the square brass tube has arrived, so today I carefully cut a 3/4" hole in the side of one of the lubricators and soft soldered in a 2" length of tube. I then noticed lots of little rollers falling out of the clutch pressed into the lubricator body - obviously there was some plastic in there! I've removed the remains of the clutch (with some difficulty) by screwing in a wood screw and then gripping the head with heavy pliers and tapping with a hammer, and I've ordered a couple of new clutches from Steamfittings here - the plastic part is blindingly obvious in this photo!
25/10/14
The clutches arrived today - very quick service - and I've completed and repainted the first lubricator as shown in this photo.
21/11/14
I took the engine down to the track yesterday to try out the enlarged lubricators and check that the binding problem encountered on the last run was not still there. Part of the track was closed for maintenance and so I was only able to run backwards and forwards a few hundred yards, but this wasn't really a problem - it's a long time since I've exercised the reverse gear. The lubricators seemed to work well but unfortunately the binding was still there, although not as bad as last time. It just happened at one end of the left hand piston stroke, and it more or less disappeared if the engine was left to cool down for a few minutes. Today I dropped the left hand connecting rod again and removed both the gland cover and the front cylinder cover - the latter just possible without removing the running board, although it might have been as quick to do so. The inside of the cylinder looked absolutely fine - nicely polished and with a thin sheen of oil - but the PTFE gland which luckily slid out of its casing as the piston rod was moved backwards was really quite a stiff fit on the rod, so I think that that is most probably the cause of the problem. I'm baffled as to why it should suddenly have happened after years of trouble-free running, though. I'll slit the PTFE cylinder and either remove it completely and replace it with graphited yarn packing or perhaps try it with the slit in to allow a bit of room for expansion.
26/4/15
Yesterday there was a meeting of the SE regional group of G1MRA at Colney Heath, but I thought I ought to leave the G1 track for the visitors so I took my Britannia for its first outing of the season rather than my G1 Rebuilt Merchant Navy. There was a good turnout of G1 locos but I had the 5" track to myself, and the weather was warm and sunny. I steamed up and set off at a good pace but unfortunately just before the end of the first lap the dreaded squeaking and binding started again. At the end of last year after the binding happened on the left hand piston rod I cut a thin diagonal slice out of the PTFE gland to allow room for expansion, and I also shortened the spring in the oil check valve because the ball in the check valve took quite some force to open (pressing it in with a plunger) and I thought that the pump might not be able to pump past it, particularly when there was steam pressure as well as spring pressure holding the ball on its seat. Yesterday the problem was on the right hand side, when the piston rod was at the rear end of its stroke. Today I put a slit in the right hand PTFE gland and shortened the spring in the right hand check valve, and I hope that this will cure the problem. The pump now definitely pumps oil through the check valve, but the test will be whether it does so against steam pressure. I'm beginning to wonder whether the O-rings in the pumps have worn and no longer generate as much pressure as they used to. If the problems persist, changing the O-rings will be the next thing to try.
17/5/15
After the last unsuccessful run I decided to replace the O-rings in the lubricators. I ordered some spares from Steamfittings and when I dismantled the lubricators I found that the old O-rings slid on the plunger rod with no resistance, while the new ones dragged gently, so I was hopeful that this was the problem. I steamed up for the public running this afternoon but unfortunately the squeak and binding were still present, so I came off after a couple of laps. The lubricators were definitely working and the oil level had gone down. I dropped the connecting rods and the piston rods would slide freely, even after blowing steam through the cylinders and drain cocks to heat things up. Someone suggested that the binding could be in the axle pump, so I lubricated that. I then went back on the track and it seemed much better - still a slight squeak at times, but no binding, so I managed to give a few rides to the visitors. I'm still not sure what's going on - I can't see why the axle pump would bind when steaming but not when pushing the cold engine along, since the pump is cooled by the water. Possibly it took a few laps for the lubricators to lubricate the cylinders thoroughly. I'll just have to persevere and hope that it continues to improve.
13/6/15
Yesterday I dismantled the axle pump to try to discover why it might have been binding. On disconnecting the eccentric from the ram I found that the ram slid freely enough in the cylinder, but the eccentric strap was an extremely loose fit on the eccentric. I undid the strap and found that it was very badly worn on the front half that takes the pressure when pushing the ram in - the diameter was nearly 2mm more front-to-back than top-to-bottom, and the brass had been deformed outwards to form a lip as shown in this photo. The eccentric had clearly been subjected to extreme pressure, not just worn through lack of lubrication. I still don't really understand why - the pump is a brass ram in a brass body, so I don't see why heat should cause it to bind. With hindsight the problem must have been caused by dismantling the pump to fit a new O-ring - see the entry for 9/9/14 above. I didn't replace the graphited string gland packing when I did this - it was impossible to get at it - but I can't see why this should have caused the problem, or indeed what purpose the packing served. I'll leave the pump off, for the time being at least, and just run with the two injectors.
14/6/15
I've now worked out what the problem was - the steel eccentric has quite low shoulders on either side of the bearing surface as shown in this photo, and I think that the strap, after some initial wear through lack of lubrication, has jumped onto one of the shoulders and jammed there. The unpainted strip on the axle also shows that the eccentric has moved sideways, probably wrenched round after the initial jamming and making subsequent jamming more likely. This explains the distortion on the edges of the strap shown in the previous photo, and is a much more plausible explanation for the extreme binding than any problem with the pump ram.
22/6/15
I steamed yesterday at the public running session for a couple of hours and the engine ran very well without the axle pump, with no hint of a squeak. I have asked Engineers Emporium who took over the Modelworks stock of spare parts whether they have a spare eccentric strap. They said they would look, but I haven't heard back from them yet. I felt quite comfortable driving with just the two injectors, so repairing the axle pump is not a big issue. The lubricators were working well but even with my expanded tanks they were empty after a couple of hours and there was far too much oil on the cladding and in my hair, so I'll try again to reduce the drive crank throw and see if they will turn reliably on a shorter stroke. If not, I can either fit thinner spacers in between the pump O-rings, or buy a 'greasetop' hat!
19/7/15
I've bought a new eccentric strap along with a spare pump O-ring from Engineers Emporium, who do seem to have a good stock of Modelworks spares. I'm not sure that they have catalogued the spares, because it takes them several days to check whether they have particular items in stock. I haven't yet fitted the strap, because I've been unable to realign the eccentric in the centre of the axle - it is jammed solid, even after removing both grub screws and even when attacked with a Stillson wrench. I think I'd have to remove the middle axle from the frames in order to sort it out, which may not be worth the effort. I ran this afternoon at the public running session for a couple of hours with only a few minor problems: one of the reverser universal joints started slipping (just a loose grub screw) so I was stuck in full forward gear for half of the session - and one of the lubricator clutches was slipping intermittently after I reduced the throw on both drive cranks to reduce the oil delivery rate. I've also noticed that the larger 24oz injector has started to produce a lot of overflow water, although it still seems to be delivering, at least to some extent. Restricting the water supply helps, but doesn't completely eliminate the overflow. I clean the injectors regularly in citric acid, but I'm wondering if the delivery pipe or clack is getting blocked - the large injector is the one that I usually use. I've just ordered a �3.99 'selfie stick' for my smartphone on eBay which hopefully I'll be able to cannibalise and attach to the tender in order to take a video of the engine driving around the Colney Heath track.
20/7/15
I removed the injectors and blew through a rubber hose into the delivery pipes, and found the 24oz side much more restricted than the 16oz. I removed the top clack and found that the end that screws into the boiler was almost completely blocked by limescale, which presumably explains the overflow problem.
2/8/15
I clamped my new 'selfie stick' across the rear of the tender and attached my smartphone to give a stable platform for videoing. This 5 1/2 minute video shows a complete circuit of the Colney Heath track, which I believe is now over 1/2 mile long with the new extension. That would give an average speed of 6 mph for the run. Despite cleaning lots of scale out of the top feed clack for the large injector, it was still overflowing and it may be that there is scale further back down the pipe, so I'll have to investigate again. The only other problem today was that the pivot pin fell out of the whistle operating lever, so I had to ask my passengers to shriek as loudly as possible whenever they saw a sign saying 'Whistle'! It all adds to the enjoyment for the little kids.
7/9/15
After the last outing I removed the steam cone from the large injector and found that it was badly worn away at the tip, which explains why it didn't work. I suspect that the citric acid solution that I've been using to clean the injectors is too concentrated - I'd been using half a teaspoon of crystals in about 25 ml of warm water, just enough to cover the injectors in the bottom of a small glass jar. I normally leave them immersed for about 10 minutes but I think I may have forgotten them the last time I cleaned them and left them for several hours. I then checked the small injector, which had been working but had started to drip a bit, and found that it was also worn, although not quite so badly.
I reported this problem in a thread on the Model Engineering Clearing House, and Julian, who has been making injectors for 30 years, very kindly offered to make me a pair of new cones. The small 16oz Chiverton injector was to the standard design and Julian was able to make a cone which worked perfectly from 90psi down to about 30psi, but the larger 24oz one proved more problematical - although definitely a Chiverton, it wasn't the standard 24oz design and seemed to be a one-off with a shorter body than normal. Julian made several cones but couldn't get the injector to work at pressures above about 75psi. We suspect that the citric acid may have damaged the other cones as well. I ran yesterday with the two refurbished injectors and gave rides to passengers for about two hours without any problem - I just had to remember to use the small injector to start with when the boiler was at full pressure. I'll buy a new 24oz injector since it's not really advisable to have only one that works at full pressure. Gordon Chiverton is sadly no longer with us, but his designs and tooling have been taken over by Len Steel who sells them through Pavier Steam. I tried to order one today but they are out of stock and won't have any more until the end of the year.
I also met Bob M at the track yesterday - he lives locally and is helping to complete a Modelworks Britannia for an elderly friend, so I've offered to pop round and see if I can help at all. It should bring back memories of all my struggles!
6/10/15
I steamed at the public running session yesterday, which was very well attended in warm autumn sunshine. That will be my last public run this season, since the final open day in two weeks time coincides with our 40th wedding anniversary and I don't suppose that I will be allowed out. The engine ran well with just the usual problem of intermittent slipping on the left hand lubricator drive. However, when I took it off the track and rolled it onto the transporter table, one of the bogie wheels fell off! This morning I checked the other bogie axle and found that with a bit of force I could also twist one of those wheels off. I've cleaned up both of them with the proper Loctite 7063 cleaner and re-glued them with a fresh tube of Loctite 638. I can't remember whether I used the 7063 when I assembled them originally - I may not have bought it until I did the driving wheels.
5/5/16
Today I had the four-yearly hydraulic boiler test and the annual steam test done successfully, although one of the injectors was temperamental so I'll need to investigate that further. I did eventually acquire a new 24oz Chiverton-design injector made by Len Steel after a 6 month wait (see 7/9/15 above), and that worked very well. I then took the engine for a run, but being out of practice I let the fire die down and ran out of steam at the far end of the track, so had an ignominious quarter mile walk back to the steaming bays!
4/7/16
I took my son Tim and grandchildren William and Amelia for a ride at Colney Heath yesterday and the kids were very excited, particularly going through the tunnel. We did a few laps but the left hand lubricator drive was slipping yet again so I took the engine off before the start of the afternoon public running session. Today I dismantled the lubricator spindle and found lots of oil in both the clutches. I cleaned them out thoroughly with solvent spray and fitted an O ring on the inside of the tank, so we'll see how it behaves next time.
24/9/17
My apologies for the lack of updates over the past year. I haven't been able to steam the Britannia this season because I used to rely on my daughter's Golf to transport the loco to the track, and she has moved away now. However my wife has now bought a new Polo and the engine will fit in this with a couple of inches to spare, so I now need to sort out the securing platform and I'll be ready to go. I'm also waiting for a new 16oz injector from Pavier/Len Steel to replace the temperamental one. I replaced the roller clutches in the left hand lubricator which were still slipping on my last run last autumn after being thoroughly cleaned, but I suspect that the hole in the lubricator body may have worn and be letting oil through onto the clutches. If so I may need to get a new lubricator.
I've been steaming my Gauge 1 Aster Rebuilt Merchant Navy at the club track from time to time this summer, although I must say that I don't find this as satisfying as driving the Brit, particularly when giving rides to the public.
I've also been busy building a Hornby 00 gauge layout for my three grandsons (and granddaughter) - well that's my excuse!
20/9/18
Another year has gone by, and unfortunately I still haven't been able to steam the Britannia. The transport problems are sorted - I now have a new C-class estate car to replace the trusty S-class saloon that I had for 16 years, which will be an easier fit for the loco than my wife's Polo - and I've fitted the new Pavier/Len Steel 16oz injector to replace the worn Chiverton. However, I've suffered a recurrence of the problem with my spinal cord that I had 7 years ago (see the entry for 10/7/11 above), where a problem with a blood vessel affects the nerves to my legs and leaves them very weak and wobbly - I can't walk very far at all at the moment. It's essentially a short circuit between an artery and a vein. I'm waiting for an operation to plug the abnormal blood vessel again, which hopefully will fix the problem. If so, fingers crossed, I may be able to steam the Britannia again next season. I certainly hope so.
10/9/19
I had the operation on my spinal cord last November, this time with open surgery on my spine, and I saw some immediate improvement - I can now walk for half an hour, albeit clinging onto my wife with one hand and walking stick with the other! It does take a long time for the nerves in the spinal cord to recover, so I'm hoping that I may still see some further improvement. I'm still keen to steam the Brit again but I think it will have to wait until next season now, by which time it will need another boiler hydraulic test.
I've just moved this website from Yahoo to IONOS - please let me know at the email address on the front page if you spot any missing files.
2/3/22
It's now over 5 years since I last steamed the Britannia, and I've regretfully come to the conclusion that I'm unlikely to be able to steam it again because of continued weakness in my legs. So I think that the time has come to sell up and let someone else have the pleasure of steaming it. I'll explore the options in the coming months. If anyone is interested in purchasing this lovely loco, please contact me via the email link on the home page.
10/3/22
Having decided last week to sell the Britannia, things have moved quickly! I contacted Station Road Steam, who are one of the best-known dealers in model steam locomotives with an excellent reputation. Mike came to see the loco last Friday, we agreed a price and the loco was collected on Tuesday, tested and certificated yesterday and is now on their website. I hope that it goes to a good home, and that the new owner gets as much pleasure from steaming it as I have had over the years. I'll keep this website operational for at least the next year.
15/3/22
I see that the Britannia is now showing as 'sold' on the SRS website - it has moved to their archive section. That was quick! The new owner is welcome to make contact via the link on my home page if he/she has any questions.
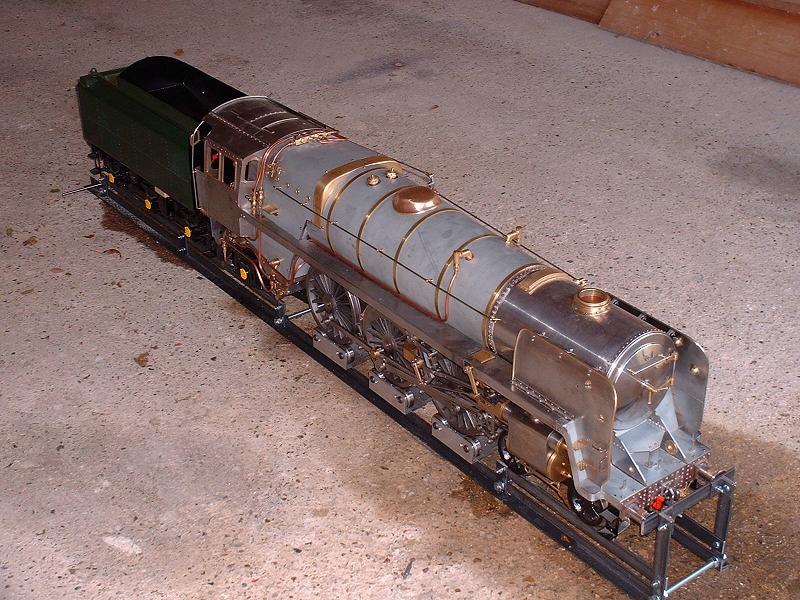 15/7/08
After sitting on an old sideboard in my study for over two and a half years of building, the loco has finally been moved onto its rolling road in the garage in readiness for its first steam trial tomorrow. Even with the help of the hydraulic lifting trolley it was quite a struggle for my wife and I to move it - it is too heavy to lift, and I had to build ramps to get the trolley down the 6" step from the house to the garage, and then to roll the loco from the trolley onto the rolling road. I fear that it may be a long time before I get my car back into the garage! The photo shows the dome cover filed and polished but not yet bolted to the cladding. I filled the tender with water and used the handpump to fill the boiler. This was a slow process, but I wanted to check that the handpump worked against boiler pressure so I filled the boiler to the brim and raised the pressure until the safety valves started to lift. I then drained it back down to working level through the water gauge blowdown valves. I may rig up an adaptor to connect the garden hose to the loco's handpump connector for future fillings. I checked the water feeds to the injectors and they gave a steady stream through the overflows. I oiled the motion with lubricating oil and filled the lubricators with steam oil, then connected the electric drill to the projecting spindles on the lubricators and ran it slowly to pump some oil through to the cylinders - the level in the lubricator reservoirs fell sufficiently to prove that they were both working. I also squirted a lot of lubricating oil down the blastpipe for good measure, and turned the motion over by hand a few times to get the oil to the valves and cylinders. Ted and Derek are coming round at 10am tomorrow, and as long as Ted remembers to bring the coal we should be all set to fire it up.
15/7/08
After sitting on an old sideboard in my study for over two and a half years of building, the loco has finally been moved onto its rolling road in the garage in readiness for its first steam trial tomorrow. Even with the help of the hydraulic lifting trolley it was quite a struggle for my wife and I to move it - it is too heavy to lift, and I had to build ramps to get the trolley down the 6" step from the house to the garage, and then to roll the loco from the trolley onto the rolling road. I fear that it may be a long time before I get my car back into the garage! The photo shows the dome cover filed and polished but not yet bolted to the cladding. I filled the tender with water and used the handpump to fill the boiler. This was a slow process, but I wanted to check that the handpump worked against boiler pressure so I filled the boiler to the brim and raised the pressure until the safety valves started to lift. I then drained it back down to working level through the water gauge blowdown valves. I may rig up an adaptor to connect the garden hose to the loco's handpump connector for future fillings. I checked the water feeds to the injectors and they gave a steady stream through the overflows. I oiled the motion with lubricating oil and filled the lubricators with steam oil, then connected the electric drill to the projecting spindles on the lubricators and ran it slowly to pump some oil through to the cylinders - the level in the lubricator reservoirs fell sufficiently to prove that they were both working. I also squirted a lot of lubricating oil down the blastpipe for good measure, and turned the motion over by hand a few times to get the oil to the valves and cylinders. Ted and Derek are coming round at 10am tomorrow, and as long as Ted remembers to bring the coal we should be all set to fire it up.